The Overflow
My first attempt of building an overflow cover. I would not recommend this design, unless you enjoy finding dead fish on the grid.
I went with Glasscages’ recommendation for overflow boxes for a 240G long tank, which is two boxes measuring roughly 7″x8″. Glasscages presumably uses scrap glass to build these boxes, and mine are not exactly the same size, so the measurements are approximate. If for some reason you need them to be exactly a certain size, I’d recommend making that clear to Glasscages when you order. I am sure they could do it, but for most people, including myself, this doesn’t matter. Two 7″x8″. boxes provide a linear overflow of 44″, which should be enough for 2900gph of water flowing through the system, or in other words plenty! There is a very handy overflow size calculator available on the Reefcentral web site, which can help you plan this part of your setup.
An issue I grappled with for a long time, and think I have only now resolved to my satisfaction about two years after setting up the tank, is how to secure the overflow against fish getting in there. It took five different approaches to finally get this right and I’d like to outline all four failed attemps, in the hope of sparing other people from having to go through the same issues I had.
1. Since I have a real rock background installed, I didn’t have a toothed rim around the overflow boxes that you see for example in the first of Greg Taylor’s articles on sumps. Initially I just skipped this part of the tank setup, and decided to worry about it later. That wasn’t a good idea, since I lost fish into the overflow and from there through the drainpipes into the micron filter bags by the dozen-load. Whenever I cleaned the micron filter bags, I found nearly all of my petricola (Synodontis petricola) in there, plus usually a number of altos (Altolamprologus compressiceps ‘Gold Head’), and even some fronts (Cyphotilapia sp. “North” (Burundi)). The fronts and catfish seemed remarkably adept to living in the mud, but I did loose a few altos that way.
2. My first attempt of securing the overflows involved cutting pieces of eggrate to shape and placing them flat on the box. The problem with this approach was that you could see the white eggrate on the top of the overflows when looking in the tank. I tried to camouflage the eggrate with black silicone and substrate sprinkled on it, but the look was never satisfactory. Also fish could end up on top of the grid (see next section) and especially the catfish would still slip through.
3. Next I got some gutter guard from the hardware store and cut that into shape to cover the overflow boxes in the same way I had done with the eggrate. The original purpose of gutter guard is to cover the gutters around the roof of your house to prevent leaves and debris from falling in there. It comes in long, thin roles and is very inexpensive. Gutter guard is black and thinner than eggrate, but still sturdy enough to lie on the box without falling in there. Also, unlike the eggrate, it was hardly perceptible when looking into the tank. The main drawback with this approach was that it constituted a death trap for fish. When frontosa panic the wildly dart through the tank, and frequently ended up on top of these grids. Sometimes I would hear the splashing and rescue them, sometimes they would wiggle around until they dislodged the grids slightly and fell into the overflow box, but mostly they would jut lie on the grid and die, where I would find them at feeding time. Cyprichromis also occasionally ended up there and petricola would still slip through.
4. I now realized that the overflow covers would have to be vertical, rather then horizontal; that is not a flat lid on top of the box, but more like a fence around it. For some time I had no idea how to accomplish that, but eventually I went out, bought ¼” acrylic, and build the fanciest overflow covers in the world. They feature double grids with mosquito netting at the bottom and gutter guard at the top. The best thing I can say about these contraptions is that they let me practice my acrylic working skills. I had never worked with acrylic before and was stunned at how easy it is to glue using methylene-chloride. It had also been about 10 years since I had worked in a chemistry research lab, and the sweet smell of solvent brought back fond memories! I also have to admit that they were great in holding back fish. Except for a couple of spawns of freshly hatched bristle nose plecos (Anchistrus sp.) I am not aware of them letting anything through. Their downfall was that they were a maintenance nightmare. Even when freshly cleaned they would severely restrict flow, and since only a small amount of debris was needed to block them up further, the water in the tank sometimes reached dangerous levels. To avoid this, I had to take out the overflow covers every few days and clean them. The gutter guard was affixed to the acrylic using silicone, and since silicone does not attach well to acrylic, during maintenance it was not unusual to loose one or more of the grids. Yet, since these covers worked well where all my previous attempts had failed; that is not killing or letting through fish, I persevered with them for quite some time.
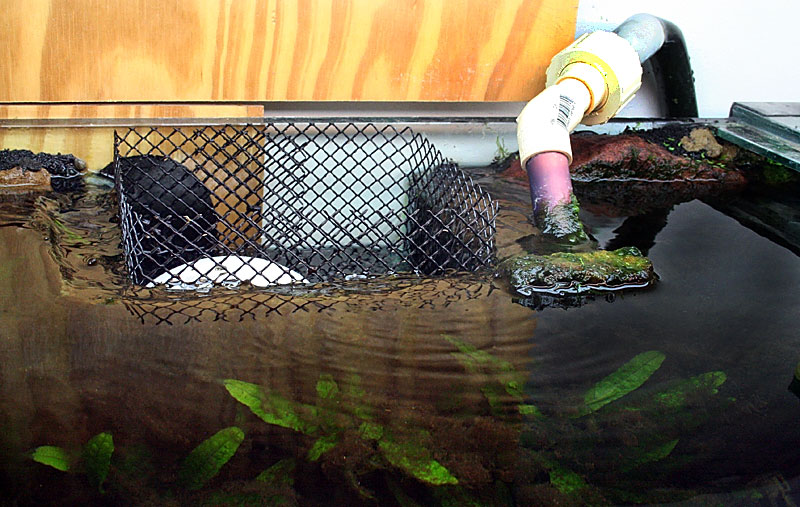
My current solution to protect fish from swimming into the overflow. On the right you can also see the return pipe from the sump with a union connection leading into the UGJ system.
5. Only when writing this, I went back to have another look at Greg Taylor’s excellent articles on sump systems, and read the very end of article three, that I must have previously overlooked. I had never seen black eggrate, and previous attempts to dye it using RIT dye had failed, because the eggrate warps when boiled in water, and does not seem to take up the dye very well. (Since then David Meager was kind enough to point me towards a source for black eggcrate. Many thanks, David!).
Anyhow, I managed to implement a slight modification of Greg’s design that I am quite happy with. I used a strip of gutter guard and formed it into a ring just slightly shorter than the circumference of the overflow box on the inner side. The ring was held together by plastic cable binders. When pushed into the overflow box, the ring automatically stays in place, because it pushes outside against the walls. It’s a little tricky to get the ring to be just the right size. I needed several tries, and wasted a bunch of cable binders, but they are cheap and the effort is well worth it. I haven’t had this overflow cover in place for very long yet, and will report as soon as I know more, but it looks very promising.
Addendum May2018:
I used the gutter guard overflow protectors until I sold the tank in 2014. They worked perfectly, and I would not hesitate to use them again in another tank with similar overflows.
Leave a Reply
You must be logged in to post a comment.
