Background

One corner of my real rock background, just installed, but not yet wet.
The initial idea for an aquarium background made from real rocks I got from Caner Gündüz, a.k.a. Furcifer, who posted pictures of his setup on Cichlid-forum.com. Unfortunately, neither the tread nor the pictures seem to be available online any longer. Anyway, the idea immediately captivated me. I had never built a background, but knew that I wanted one. Many rift lake cichlids only feel comfortable swimming as high in the tank as the highest rock structures reaches. In Germany I had gone to tremendous length to built huge slate caves, but a background seemed like a much better, more permanent, and easier to maintain solution. I have seen amazing looking pictures of backgrounds made from plastic, concrete, and similar materials that people posted online, but even if they looked natural, I knew deep in my heart that if they were in my tank, I would never be able to forget that they were not rocks, but concrete, plastic, or what have you, and I would never be able to look at them and be really happy about it. However, as soon as I saw photos of Caner’s real rock background, I knew that I would want one like this.
The question was how to get the rocks to stick to the background. In my very first tank back home in Germany, I had experimented with attaching the rocks to each other using silicone, to create a big, permanent rock labyrinth. The structure hadn’t lasted very long, and from then on I had always built my cave structures by simply balancing the rocks on top of each other. Yet, silicone was pretty much the only thing I could think of to glue the rocks to the back wall of the tank. If I was going to experiment with this, I was not going to try it on a 240G tank. In addition, there were a few other things, like for example an under gravel jet (UGJ) system, that I had only read about on the Internet, and was keen to check out in a smaller setting before installing the in the 240G. I purchased a 29G tank from Walmart to be used as a guinea pig for some of the techniques on trial for the 240G, and to be turned into a South American tank that would give me something to look at while I was planning and setting up the big tank. At the time I hadn’t had a tank in nine years, and was desperate to get something running. The setup of the 29G SA tank will be discussed separately on this site, but as far as the background is concerned, I picked up some flagstone pieces of not more than 2″ thickness at a local creek, laid them out on the ground at the local DIY carwash, and gave them a good cleaning with the power washer. Once the rocks had dried overnight, I put the tank on the floor with the future back wall on the ground. Then I covered this side of the tank completely with flagstone, starting with thicker pieces at the bottom and choosing some nice big ones that would reach all the way to the water surface in the middle.
I tried to create a nice natural looking pattern. My Dad used to be a landscape gardener, and has designed many beautiful rock gardens in Germany. A design principal that I picked up from him is that the rocks should look really stable; that is not like they are just about to topple over. For this you want to have the big ones at the bottom and smaller ones at the top, and it is worth really looking at every rock, and finding just the right place for it. This is a lot like completing a jigsaw puzzle, but with a lot more creative freedom. Much later I learned that this design principle is also important in creating the fantastic Japanese Zen Gardens, which serve aquascape design guru Takashi Amano as an inspiration for the creation of many of his aquarium art pieces. I am a great admirer of Amano and own a range of his books. Anyway, on the viewer stable rock formations tend to have a calming and relaxing effect, which I think is desirable for almost any aquarium setup.
For the 29G I used GE Silicone II for door and window. It should be available at any Lowes or Home Depot, but don’t confuse it with the silicone they sell for bath and kitchen. The latter contains mildew inhibitors which are harmful to fish. Rumors on the Internet have it that the door and window variety used to state that it’s aquarium safe on the packet, and only stopped doing so when GE started a collaboration with Allglass to sell some of this stuff under the Allglass brand name with a significant markup. As I said, it’s a rumor, but it sounds very plausible to me and at any rate, GE Silicone II for door and window is definitely aquarium safe. I have used it for years and never had a problem.
For the 29G tank I used clear silicone, and sprinkled substrate on it in the places where it protrudes between the flagstones. My substrate is black T-grade 3M Color Quartz, and unfortunately the silicone cures white. It’s not a big eyesore, but for the 240G tank, where I am using the same black substrate, I used black silicone. Once the silicone had cured and securely attached the flagstone to the back wall of the 29G, I turned the tank in the upright position, and proceeded to lift it onto its stand. I was stunned by how heavy the tank had become. In fact, I am a 6′ tall guy and barely managed to get the 29G onto its stand by myself. Now, nearly 3 years later, I can say that the rock background in the 29G has held up well. There were two places were I used silicone to attach rocks to rocks, to create a little planter for Java fern, and to add visual interest, and in both of these places the rock has come loose. However, the rock siliconed to the glass is still holding on strong. Now partly overgrown with Java fern and Java moss, the background simply looks stunning.

The rocks are being delivered.
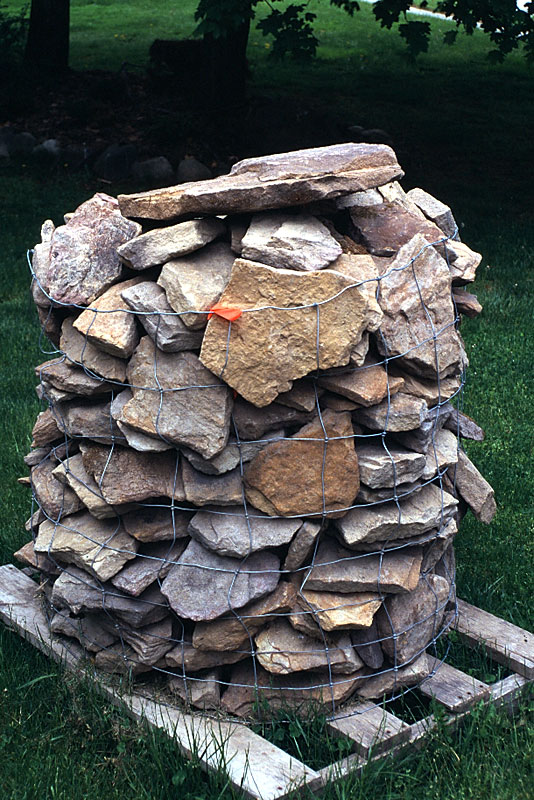
This palette holds 1 ton of rocks – about 3-4 times as much as I actually used for the 240G tank.
For the 240G it would not be possible to pick up all the rocks from a creek, so I went to a local building and landscaping rock supplier (Ohio Beauty Cut Stone Inc., 40 W. Turkeyfoot Lake Road, Akron OH 44319, Phone: 330-644-2241, Fax: 330-644-5559). The selection of rocks they had on offer was simply stunning, and visiting their stone yard should be well worth your while even if you have a longer trip to make to get there. I ordered one of their cheapest rocks, thin Ohio Top Rock, which seemed just perfect for my purposes. The estimated maximum thickness of the rocks is about 3″ to 4″. I found estimating how many rocks I would need very difficult, and I ended up having a palette with one ton – yep, 2000 pounds! – of rocks delivered to my house. The cost was quite reasonable at $140 for the rocks and $65 for delivery. Tax brought the total up to $272.21. When I drove home I was still wondering if I should have ordered more, but once the background was completed, I had only used up about 1/4 to 1/3 of the rocks. The remainder will come in handy for gardening and landscaping projects around the house. Also, it wasn’t completely useless to order a complete palette, since this gave me the opportunity to pick the biggest and nicest rocks out of a wide selection. Most importantly, I chose three big slabs of rock for the middle section of the background between the overflow boxes. Each of these pieces reached from the bottom of the tank all the way up over the present water surface. There were only three pieces of comparable size on the palette. While lifting these pieces into the tank I had to be extremely careful as they could only just be angled diagonally between the center braces into the tank. I covered the tank floor thickly with Styrofoam during this process in order to prevent bumps. Unlike in the 29G, I did not feel comfortable putting the huge weight of these large rocks directly onto the tank floor. As a result I covered the area under the rocks with a thin strip of Styrofoam, which I left in place, and eventually sealed towards the front with silicone to prevent fish from digging into it. So far I haven’t had any problems with it, and the tank is holding up well.
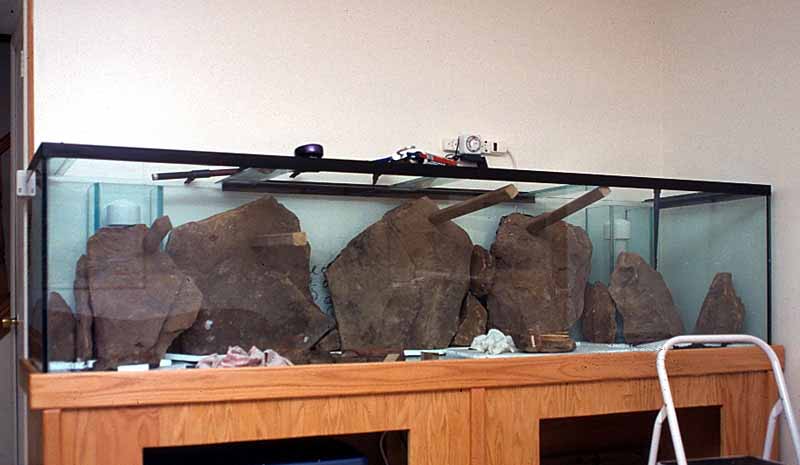
You can see the 2×2 pieces of lumber, which prevent the largest rocks from tipping forward until the silicone has cured.
Considering that I had needed six people to move the empty tank into the house (many thanks to the students from my wife’s research group helping out, especially Mike Radomski, who I believe at one stage was holding the tank up all by himself!), there was no chance to move the tank by one bit once the rocks were in place. The technique I used to install the background in the 240G involved putting the large rocks at the bottom in place first and bracing them against the front glass using 2×2 lumber that I cut to just the right length.
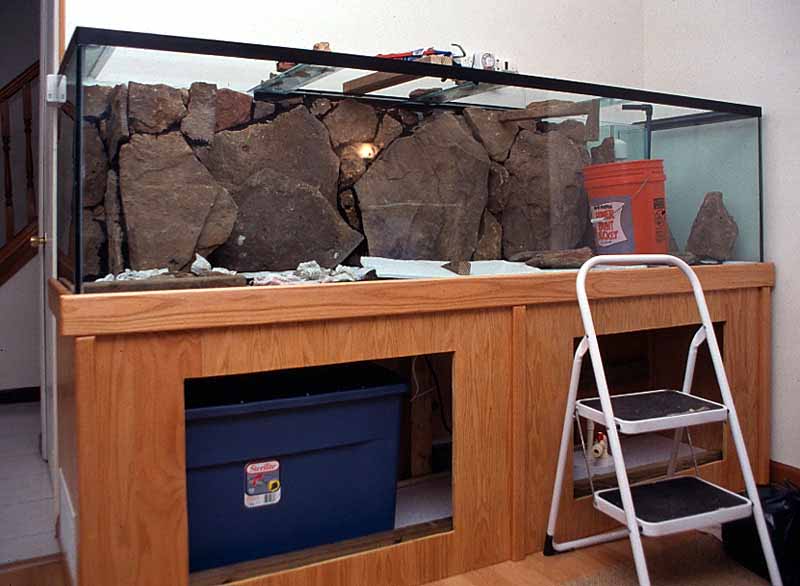
Real rock background; one rock at the top still supported by 2×2; right-hand side not yet complete.
Once the silicone used for the bottom layer of rocks was cured, I could then add the second layer, moving the 2×2 braces as required. In this way over the course of several days I eventually completed the whole background. As discussed, for this tank I used black silicone, and I also filled in the gaps between the rocks with this material as well as possible. Once the silicone was in place, I coated it with substrate to make it look even less obtrusive. There are very few places were I left confined areas open behind the rocks that the fish can use as caves. Yet, it appears that the fish quickly found any remaining gaps and manage to disappear completely behind the background. For example I have about two dozen Synodontis petricola in the tank, which I bought when very little, but some of whom are now approaching 4″. I never ever see these catfish during the day, since they choose to live entirely in and behind the background. They don’t even come out at feeding time, and people have suggested that I feed less to make this happen, but the main purpose of this tank right now is to grow out my frontosa, so I feed plenty for that reason. The only time I am seeing the petricolas is at night with just the moonlight on. During this time the whole tank seems to be swarming with petricolas, and the swarm freely through all levels of the water column.

Real rock background, just installed, but not yet wet.
The possibility of fish disappearing behind the background is its only possible disadvantage. Now, two years after setting it up, it continues to overgrow with algae, Java fern, and Java moss, and I am extremely happy with its natural look.

Real rock background, about 2 years after installation.
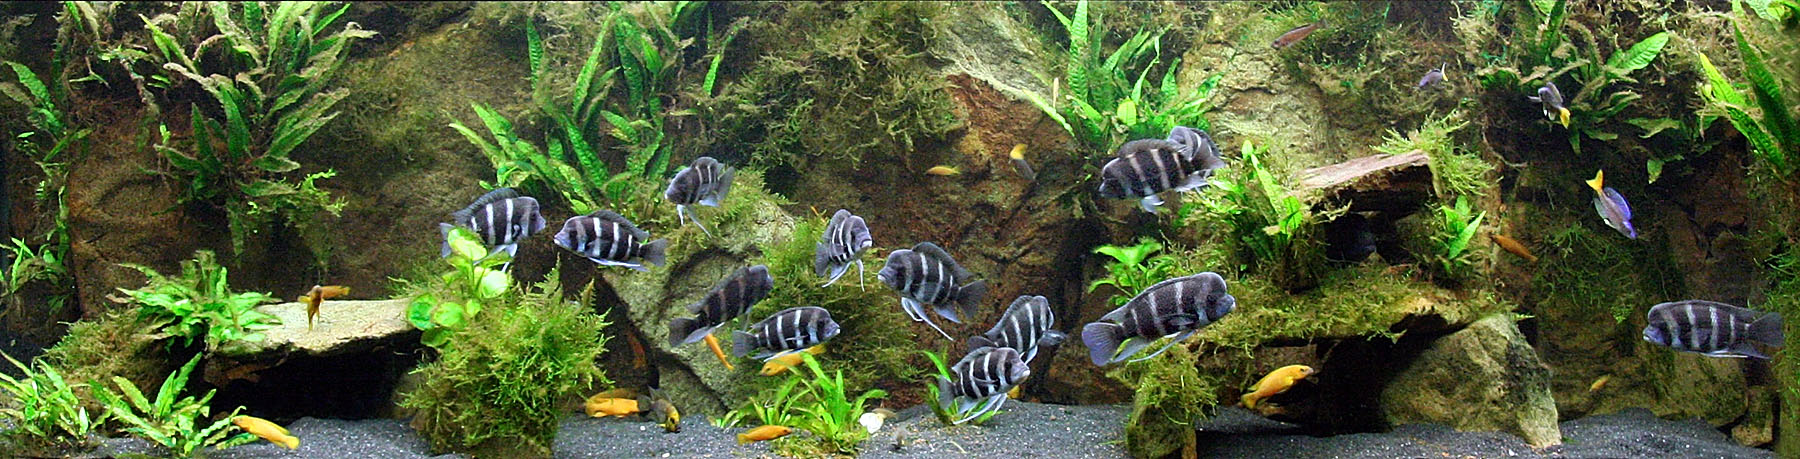
Real rock background, about 3 years after installation.
3 Responses to “Background”
Leave a Reply
You must be logged in to post a comment.

March 8th, 2008 at 5:21 pm
Just stunning. Creates a perfect natural look to the display, and I hear Frontosa prefer Ohio sandstone to your ordinary run of the mill rift lake geomorphology anyway.
June 4th, 2021 at 10:52 am
[…] Image Source: fmueller.com […]
June 9th, 2021 at 8:35 pm
[…] Izvor slike: fmueller.com […]