Woofer Re-foaming
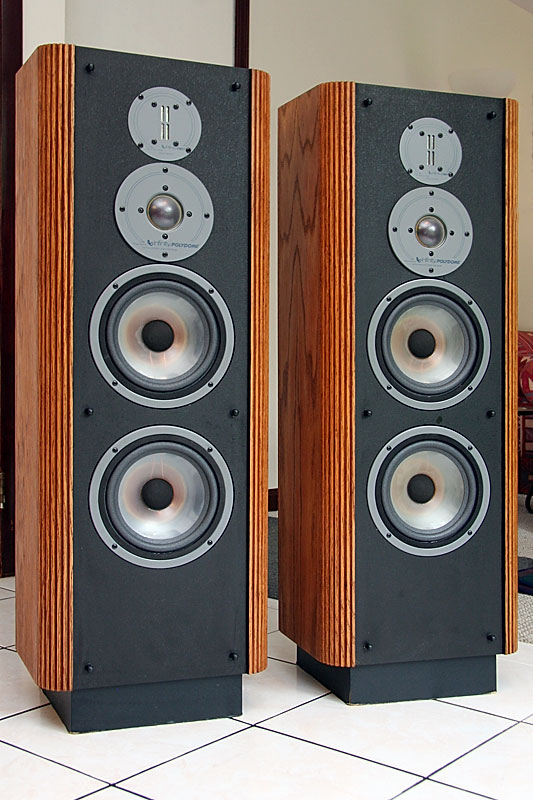 My cheap, second-hand pair of Infinity RS-4b - woofers refoamed, cleaned up, polished, and ready to provide me with years of enjoyment!
I've been interested in music for a long time - after all, who isn't? But recently I made a more serious entry into the audio world by acquiring some vintage audio equipment. I have enjoyed vintage camera equipment for years - particularly manual focus Minolta SLR cameras and the associated Rokkor lenses - but I've never really looked into their audio equivalents, presumably because I moved back and forth from the US with 120V and the rest of the world with 220V. As a result, acquiring anything that plugs into a wall outlet was a rather temporary affair for me until recently. As it turns out, vintage audio equipment can provide incredible value for money - especially if you include gear from the 1980s and 1990s, which most real vintage audio geeks consider not-so-vintage, and also sometimes refer to as 'cheap junk'!
One of the first pieces of equipment I acquired was a pair of Infinity RS-4b speakers. They were advertised on Craigslist as Infinity RS-46 for not much money with a crappy photo taken in a dark garage, but Tedrick on AudioKarma was kind enough to enlighten me as to what they really were. That happened late at night, but I emailed the seller immediately, and had a response back by the next morning with a phone number. The guy said he wanted to sell these because "they had gone out of style" and he was now using "one of these little Bose systems". Of course if you are into vintage audio gear you will read stuff like this on AudioKarma every day, but who ever expects to find a guy like that in the real world? Anyhow, it kind of fitted in, because the suburb where the speakers were located is one of those places where big mansions in a beautiful park-like setting attract people with a lot more money than sense to live there! So I raced to his place. The seller couldn't get over the fact that by morning his mailbox had been filled with inquiries about the speakers from people as far away as Pittsburgh, while he though surely even college kids these days wouldn't fill their dorm rooms with old junk like this, when they could use "one of these little Bose systems". I didn't hesitate to support him in his beliefs, and easily managed to bargain him down by a few dollars. Shortly after 9am that morning, I was the proud owner of a pair of Infinity RS-4b.
Being as ignorant as I was then, I thought them to be in absolute mint condition. I assumed that all the gooey stuff around the front and in the grill covers was dust mixed with moisture from the garage. Only when I got them home did I realize that this gooey stuff was the only thing that was left of the woofers' surrounds. Luckily it turns out this is an extremely easy DIY fix, and how to accomplish that is the subject of this article.
My cheap, second-hand pair of Infinity RS-4b - woofers refoamed, cleaned up, polished, and ready to provide me with years of enjoyment!
I've been interested in music for a long time - after all, who isn't? But recently I made a more serious entry into the audio world by acquiring some vintage audio equipment. I have enjoyed vintage camera equipment for years - particularly manual focus Minolta SLR cameras and the associated Rokkor lenses - but I've never really looked into their audio equivalents, presumably because I moved back and forth from the US with 120V and the rest of the world with 220V. As a result, acquiring anything that plugs into a wall outlet was a rather temporary affair for me until recently. As it turns out, vintage audio equipment can provide incredible value for money - especially if you include gear from the 1980s and 1990s, which most real vintage audio geeks consider not-so-vintage, and also sometimes refer to as 'cheap junk'!
One of the first pieces of equipment I acquired was a pair of Infinity RS-4b speakers. They were advertised on Craigslist as Infinity RS-46 for not much money with a crappy photo taken in a dark garage, but Tedrick on AudioKarma was kind enough to enlighten me as to what they really were. That happened late at night, but I emailed the seller immediately, and had a response back by the next morning with a phone number. The guy said he wanted to sell these because "they had gone out of style" and he was now using "one of these little Bose systems". Of course if you are into vintage audio gear you will read stuff like this on AudioKarma every day, but who ever expects to find a guy like that in the real world? Anyhow, it kind of fitted in, because the suburb where the speakers were located is one of those places where big mansions in a beautiful park-like setting attract people with a lot more money than sense to live there! So I raced to his place. The seller couldn't get over the fact that by morning his mailbox had been filled with inquiries about the speakers from people as far away as Pittsburgh, while he though surely even college kids these days wouldn't fill their dorm rooms with old junk like this, when they could use "one of these little Bose systems". I didn't hesitate to support him in his beliefs, and easily managed to bargain him down by a few dollars. Shortly after 9am that morning, I was the proud owner of a pair of Infinity RS-4b.
Being as ignorant as I was then, I thought them to be in absolute mint condition. I assumed that all the gooey stuff around the front and in the grill covers was dust mixed with moisture from the garage. Only when I got them home did I realize that this gooey stuff was the only thing that was left of the woofers' surrounds. Luckily it turns out this is an extremely easy DIY fix, and how to accomplish that is the subject of this article.
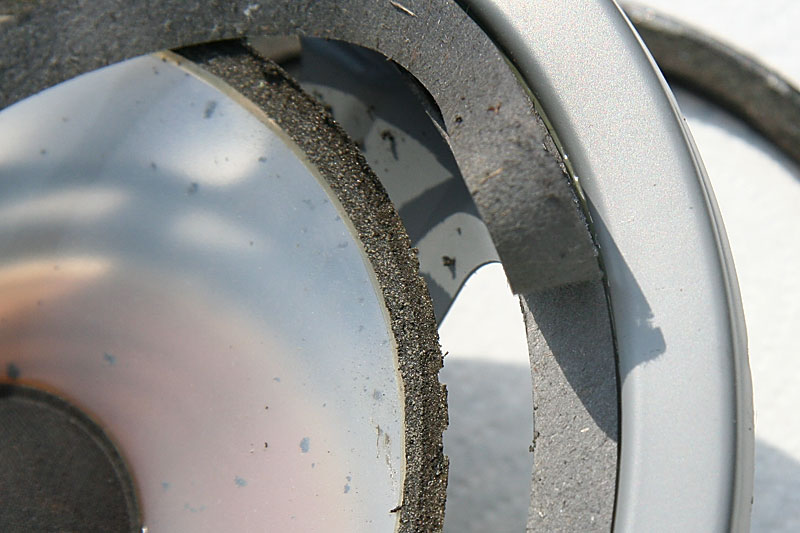
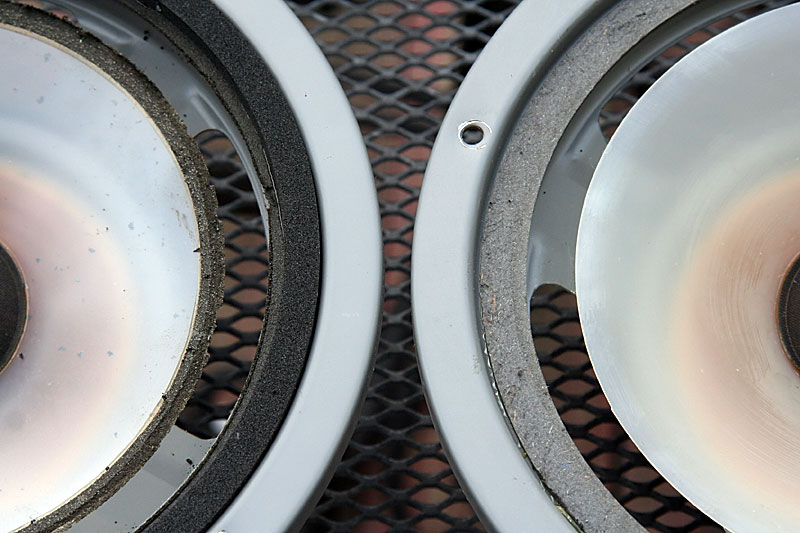
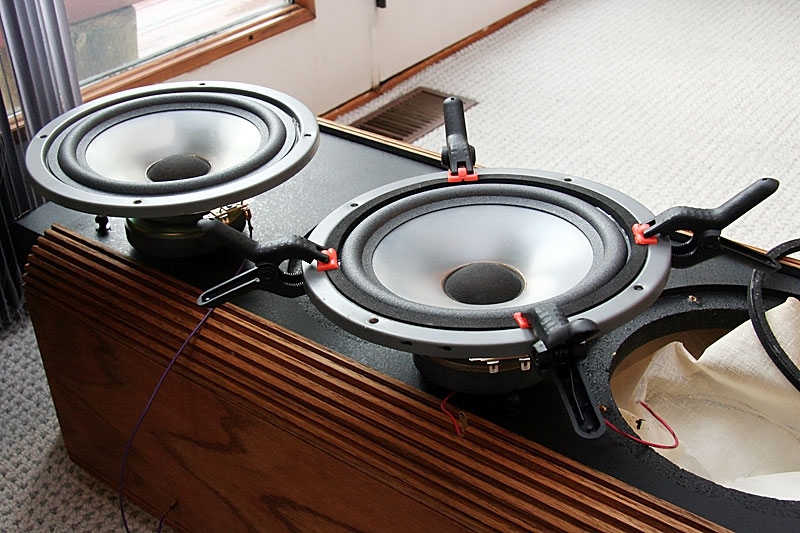
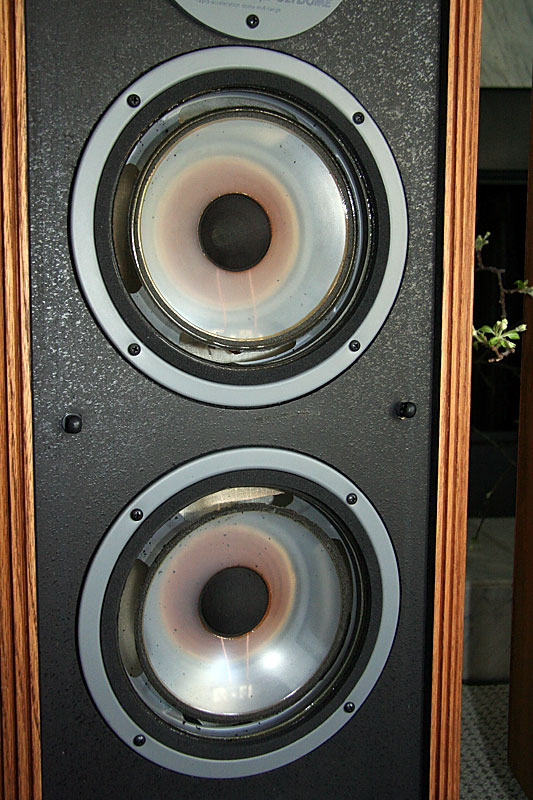 The surrounds in these Infinity RS-4b woofers have completely disintegrated, and you can look through between the speaker cone and the speaker casing straight into the cabinet.
There is no shortage of instructions how to re-foam speakers online, and when you buy a re-foaming kit, instructions how to install the surrounds are usually included. However, I found that these instructions have typically been written by people who have re-foamed hundreds of speakers themselves, and while it is reassuring to have instructions based on so much knowledge, I found that sometimes these people have forgotten how little the newcomer knows about woofers and their surrounds. In addition, they often just tell you what to do, but don't explain why. Only if you understand why something is done can you make an informed decision whether it's necessary in your particular case. That's why I found it worth writing my own instructions after having re-foamed only this one single pair of speakers. Casting all humility aside, I also think that my pictures are of well above average quality! Regardless of which instructions you follow, I think you will find that re-foaming speakers is easy, and pretty much anybody can do a decent enough job at it. Since refreshingly few people know that, speakers with shot surrounds can often be had for a song, and thus provide some of the best deals in vintage audio equipment.
On recommendation of fellow AudioKarma members, I bought my surrounds from GeoAli's eBay store. The surrounds seem like top notch quality, and were a perfect fit for the Infinities. I also like the fact that GeoAli sells the surrounds my brand and model name of the speaker, not measurements of the woofers. The latter seems to lead to considerable confusion when ordering, and people appear to frequently end up with the wrong surrounds for their speaker. That said, GeoAli sells only re-foaming kits, which are not your cheapest option. There is enough glue in the kit to re-foam a truck load of speakers, so for my next project I won't need another bottle. There are other glue options available as well. Also included in the kit are little brushes - which you can get a score of for a buck at the dollar store - as well as 'shims' - which are just paper snippets.
The surrounds in these Infinity RS-4b woofers have completely disintegrated, and you can look through between the speaker cone and the speaker casing straight into the cabinet.
There is no shortage of instructions how to re-foam speakers online, and when you buy a re-foaming kit, instructions how to install the surrounds are usually included. However, I found that these instructions have typically been written by people who have re-foamed hundreds of speakers themselves, and while it is reassuring to have instructions based on so much knowledge, I found that sometimes these people have forgotten how little the newcomer knows about woofers and their surrounds. In addition, they often just tell you what to do, but don't explain why. Only if you understand why something is done can you make an informed decision whether it's necessary in your particular case. That's why I found it worth writing my own instructions after having re-foamed only this one single pair of speakers. Casting all humility aside, I also think that my pictures are of well above average quality! Regardless of which instructions you follow, I think you will find that re-foaming speakers is easy, and pretty much anybody can do a decent enough job at it. Since refreshingly few people know that, speakers with shot surrounds can often be had for a song, and thus provide some of the best deals in vintage audio equipment.
On recommendation of fellow AudioKarma members, I bought my surrounds from GeoAli's eBay store. The surrounds seem like top notch quality, and were a perfect fit for the Infinities. I also like the fact that GeoAli sells the surrounds my brand and model name of the speaker, not measurements of the woofers. The latter seems to lead to considerable confusion when ordering, and people appear to frequently end up with the wrong surrounds for their speaker. That said, GeoAli sells only re-foaming kits, which are not your cheapest option. There is enough glue in the kit to re-foam a truck load of speakers, so for my next project I won't need another bottle. There are other glue options available as well. Also included in the kit are little brushes - which you can get a score of for a buck at the dollar store - as well as 'shims' - which are just paper snippets.
 Glue, brushes and shims provided in GeoAli's re-foaming kit.
A good person to get just surrounds from, without the price inflating kit, is Gene Gzsanka. For a while, Gene made quite a name for himself as Re-edger on AudioKarma, but I haven't seem him on the site in a while.
Glue, brushes and shims provided in GeoAli's re-foaming kit.
A good person to get just surrounds from, without the price inflating kit, is Gene Gzsanka. For a while, Gene made quite a name for himself as Re-edger on AudioKarma, but I haven't seem him on the site in a while.
Cleaning the woofer and removing the old surround material.
The first thing to do in any re-foaming job is the removal of the old surrounds. In my case the actual surrounds had disintegrated to the point were they basically weren't there any more. There was just the typical sticky residue where they had been attached to the speaker cones in the middle, and under the foam mounting gasket on the speaker casing on the outside. The woofers in the condition I bought them - the surrounds are basically gone!
On the outside the setup is as follows - 1. metal speaker casing, 2. cardboard ring, 3. foam surround, 4. rubber mounting gasket. The rubber mounting gasket came off easily using a knife, taking most of the old surround material with it.
The woofers in the condition I bought them - the surrounds are basically gone!
On the outside the setup is as follows - 1. metal speaker casing, 2. cardboard ring, 3. foam surround, 4. rubber mounting gasket. The rubber mounting gasket came off easily using a knife, taking most of the old surround material with it.
 Woofer with the rubber mounting gasket removed.

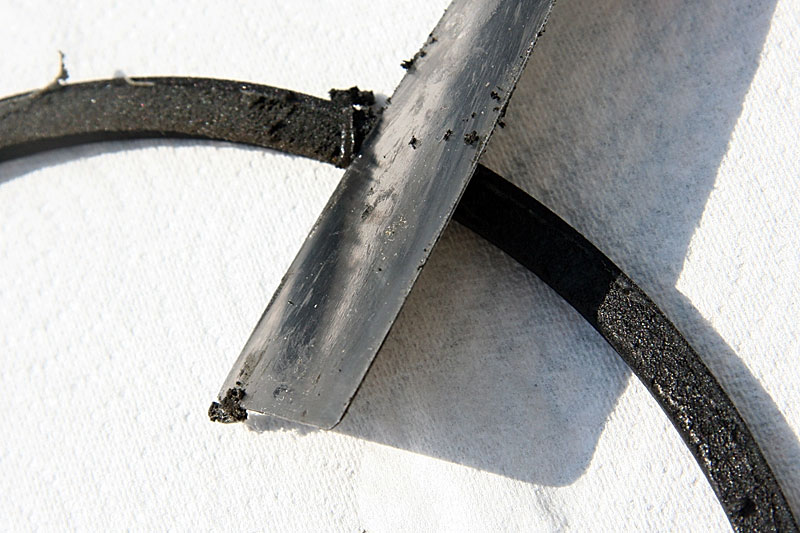
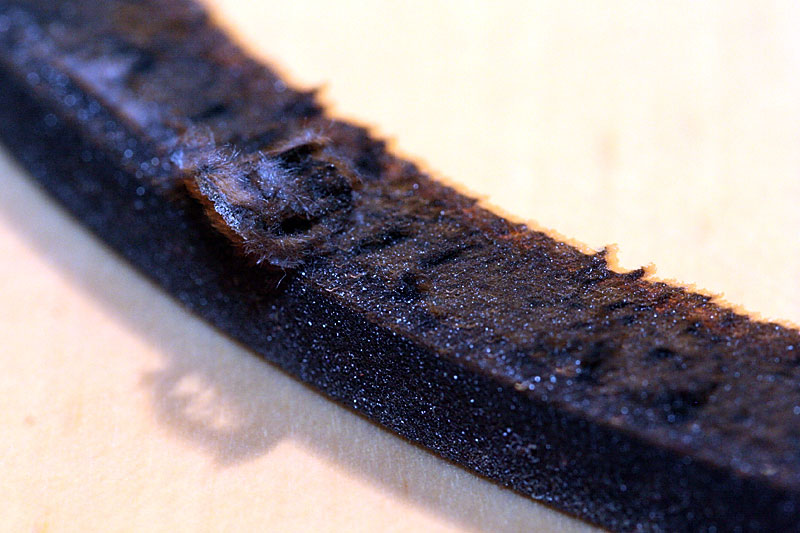 The rubber mounting gasket.
Then I pealed off a thin layer of the cardboard ring, which got rid of the rest of the old surround material. This made the cardboard ring slightly thinner, but the exact thickness of that ring does not matter for speaker performance, and gluing the surrounds to a clean cardboard surface surely must have given better grip than trying to attach them to remains of old surround material.
The rubber mounting gasket.
Then I pealed off a thin layer of the cardboard ring, which got rid of the rest of the old surround material. This made the cardboard ring slightly thinner, but the exact thickness of that ring does not matter for speaker performance, and gluing the surrounds to a clean cardboard surface surely must have given better grip than trying to attach them to remains of old surround material.
 Pealing off a thin layer of the cardboard ring together with the rest of the old surround material.
The instructions from GeoAli I followed were written with paper cones in mind, and cautioned against the use of solvents and any too thorough removal of old surround material from the cones. The Infinity RS-4b woofers use polymer (plastic) cones that I found to be perfectly resistant against Goof Off. Using plenty of this solvent based paint stripper, I managed to completely clean the old surround material off the cones. I doubt it is necessary to do such a thorough job - I guess as long as the new surrounds will stick to the cones that will do the job - but it sure gave me a good feeling to see the cones completely clean.
Doing this job outside on the deck on a sunny day helped in two ways. Firstly you want to do this in a well ventilated area to avoid inhalation of excessive amounts of solvent fumes, and secondly having the cones and the old surround material heated up nice and warm by the sun made the gunk come off a lot easier.
Pealing off a thin layer of the cardboard ring together with the rest of the old surround material.
The instructions from GeoAli I followed were written with paper cones in mind, and cautioned against the use of solvents and any too thorough removal of old surround material from the cones. The Infinity RS-4b woofers use polymer (plastic) cones that I found to be perfectly resistant against Goof Off. Using plenty of this solvent based paint stripper, I managed to completely clean the old surround material off the cones. I doubt it is necessary to do such a thorough job - I guess as long as the new surrounds will stick to the cones that will do the job - but it sure gave me a good feeling to see the cones completely clean.
Doing this job outside on the deck on a sunny day helped in two ways. Firstly you want to do this in a well ventilated area to avoid inhalation of excessive amounts of solvent fumes, and secondly having the cones and the old surround material heated up nice and warm by the sun made the gunk come off a lot easier.

 Cleaning the cones using Goof Off.
The rubber mounting gasket also proved to be resistant to Goof Off. After scraping most of the old surround material off the gasket with a metal spatula, I wiped it down with that solvent mixture.
Cleaning the cones using Goof Off.
The rubber mounting gasket also proved to be resistant to Goof Off. After scraping most of the old surround material off the gasket with a metal spatula, I wiped it down with that solvent mixture.
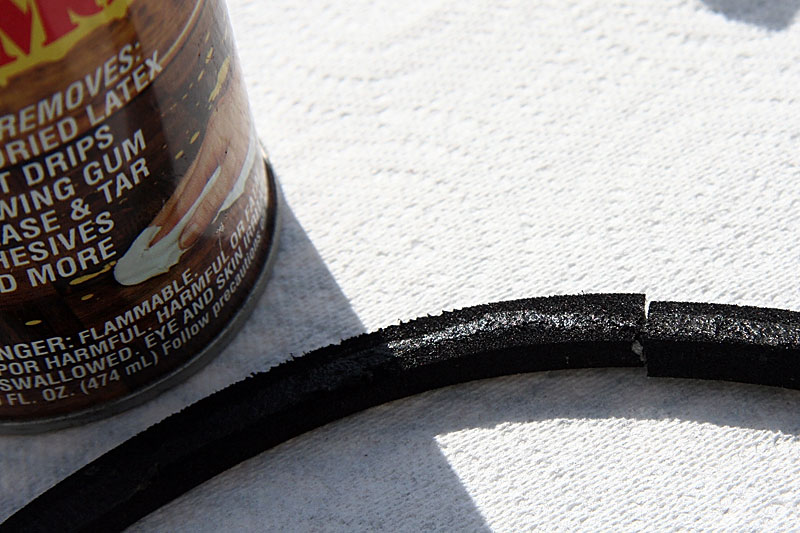 Cleaning the cones using Goof Off.
The following pictures on the left show a woofer with disintegrated surround and on the right one with rubber mounting gasket taken off as well as cleaned cone and all old surround material removed. The woofer on the right is ready for the installation of new surrounds.
Cleaning the cones using Goof Off.
The following pictures on the left show a woofer with disintegrated surround and on the right one with rubber mounting gasket taken off as well as cleaned cone and all old surround material removed. The woofer on the right is ready for the installation of new surrounds.
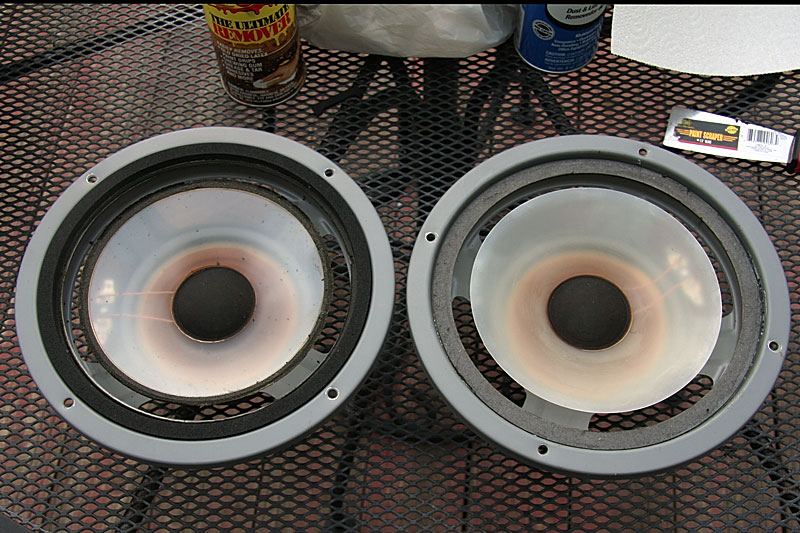
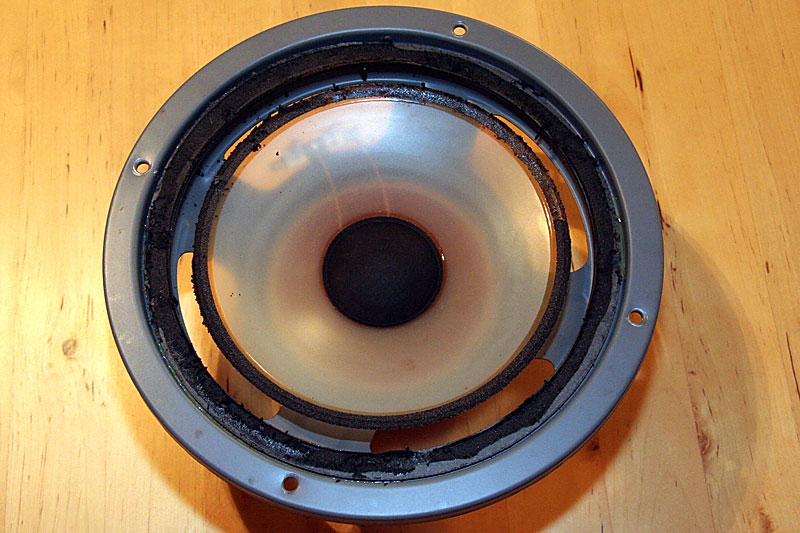
 Left: woofer with disintegrated surround. Right: rubber mounting gasket taken off, cone cleaned, all old surround material removed.
Attaching the new surrounds and centering.
The first step in installing the new surrounds was attaching them to the woofer cones. The glue used to do this was left to dry overnight. The next day this would allow me to center the woofers by attaching the outside of the surrounds to the speaker casing.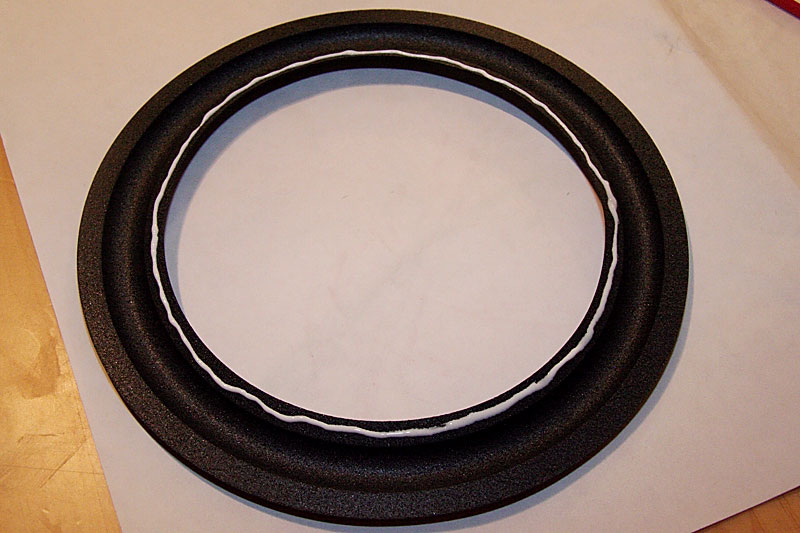 Glue applied to the inside of the surround for attachment to the speaker cone.
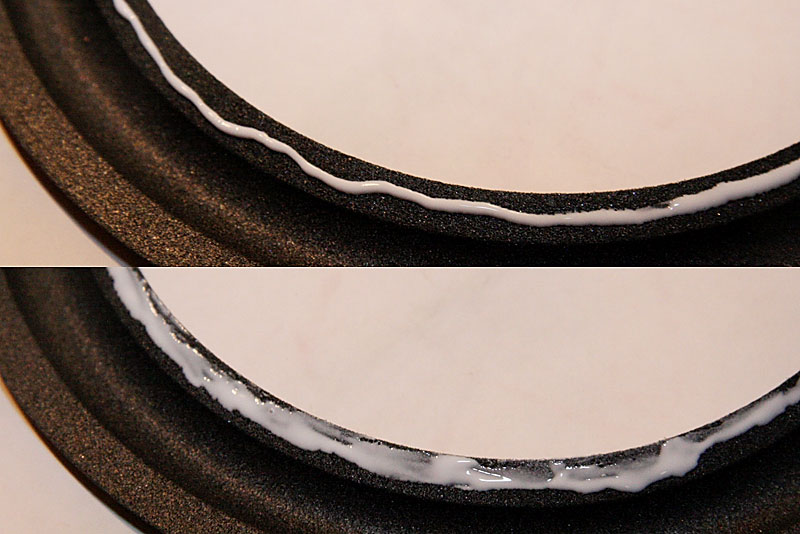 Top: glue applied in the thin line that comes out of the glue bottle. Bottom: glue spread out using one of the brushes supplied as part of the re-foaming kit.
 The glue connection between surround and speaker cone is visible from the back through the transparent poly cone.
When I started reading up on woofer re-foaming I couldn't help but wonder why people where so obsessed with centering the surrounds. Sure, it's got to look better having them nice and centered than hanging crooked to one side, but surely one could eye-ball that, and in most speakers the surrounds end up hidden behind the grill cloth. Well, like me and anybody who has actually re-foamed a woofer, you will find out that centering is not merely a cosmetic issue, and that's why people make such a big deal out of it. As I understand it, in any woofer the so called voice coil moves in and out inside a permanent magnet. The voice coil is attached to the speaker cone, and the whole assembly acts as a kind of air pump that produces the tone. If the voice coil rubs on the sides of the magnet that will distort the tone, and the speaker will sound horrible. The whole process of centering is not so much about centering the surround as about centering the voice coil inside the magnet to prevent it from rubbing.
One way to accomplish that, and probably the safest way, is to wedge shims (small paper snippets) between the voice coil and the permanent magnet while installing the surrounds. Once the surrounds are in place, they keep the voice coil centered and prevent it from rubbing when it moves in and out while the speaker is operating. The catch here is that you need to remove the dust cap at the center of the speaker in order to be able to put the shims where they need to go. If the dust cap has already come loose, or if you want to replace the dust cap for whatever reason, this is definitely the way to go. However in the particular case of my Infinity RS-4b speakers, the dust cap was in perfectly good shape with no need to be replaced, and the dust cap in these speakers is extremely well attached, and seemed an absolute pain to remove. That's why I chose another way of centering, which involves the use of a tone generator.
If you don't want to use shims, another way to make sure your voice coil is well centered is by checking that it does not rub while you install the surrounds. Some people just play music for that purpose, but it seems safer to run through a series of defined tones making sure you cover the whole tone spectrum. I followed the recommendations of fellow AudioKarma members, and ran from 50Hz to 400Hz in 50Hz intervals. That can easily be done using a tone generator which for example is part of Audacity, a free digital audio editing software that can be downloaded from the Sourceforge web site. I installed this software to my laptop, which was connected to an old Fisher CA-39 integrated amplifier that I have lying around to use for odd jobs like this. This amp was hooked up to the Infinity speakers, allowing me to test the woofers during the surround installation procedure.
The glue connection between surround and speaker cone is visible from the back through the transparent poly cone.
When I started reading up on woofer re-foaming I couldn't help but wonder why people where so obsessed with centering the surrounds. Sure, it's got to look better having them nice and centered than hanging crooked to one side, but surely one could eye-ball that, and in most speakers the surrounds end up hidden behind the grill cloth. Well, like me and anybody who has actually re-foamed a woofer, you will find out that centering is not merely a cosmetic issue, and that's why people make such a big deal out of it. As I understand it, in any woofer the so called voice coil moves in and out inside a permanent magnet. The voice coil is attached to the speaker cone, and the whole assembly acts as a kind of air pump that produces the tone. If the voice coil rubs on the sides of the magnet that will distort the tone, and the speaker will sound horrible. The whole process of centering is not so much about centering the surround as about centering the voice coil inside the magnet to prevent it from rubbing.
One way to accomplish that, and probably the safest way, is to wedge shims (small paper snippets) between the voice coil and the permanent magnet while installing the surrounds. Once the surrounds are in place, they keep the voice coil centered and prevent it from rubbing when it moves in and out while the speaker is operating. The catch here is that you need to remove the dust cap at the center of the speaker in order to be able to put the shims where they need to go. If the dust cap has already come loose, or if you want to replace the dust cap for whatever reason, this is definitely the way to go. However in the particular case of my Infinity RS-4b speakers, the dust cap was in perfectly good shape with no need to be replaced, and the dust cap in these speakers is extremely well attached, and seemed an absolute pain to remove. That's why I chose another way of centering, which involves the use of a tone generator.
If you don't want to use shims, another way to make sure your voice coil is well centered is by checking that it does not rub while you install the surrounds. Some people just play music for that purpose, but it seems safer to run through a series of defined tones making sure you cover the whole tone spectrum. I followed the recommendations of fellow AudioKarma members, and ran from 50Hz to 400Hz in 50Hz intervals. That can easily be done using a tone generator which for example is part of Audacity, a free digital audio editing software that can be downloaded from the Sourceforge web site. I installed this software to my laptop, which was connected to an old Fisher CA-39 integrated amplifier that I have lying around to use for odd jobs like this. This amp was hooked up to the Infinity speakers, allowing me to test the woofers during the surround installation procedure.
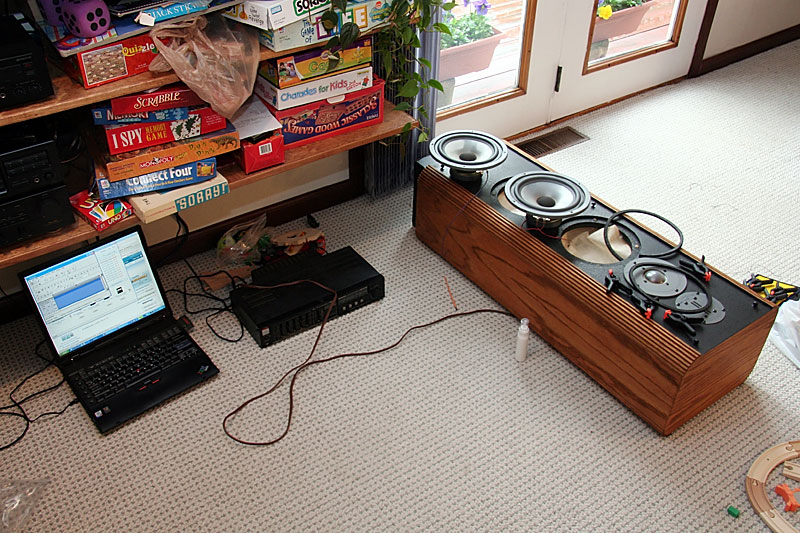 My centering setup consisting of laptop with Audacity tone generating software and Fisher CA-39 amp.
 Woofer on the left centered, just disconnected from amp, and waiting for the glue to dry. Woofer on the ready to be hooked up to amp, having glue applied to go through the centering procedure.
 All four woofers are perfectly centered. The last one is still hooked up to the centering setup.
The surrounds had been attached to the speaker cone the previous day. Now I tilted the outside of the surrounds a little upward, and applied a thin ring of glue between them and the top of the cardboard ring on the outside of the speaker casing. Then I applied a similar thin ring of glue to the underside of the rubber mounting gasket that I had previously removed from the woofers. I then installed the rubber mounting gasket and held the surrounds in place by plastic clamps. These clamps are available as sets of four for $1 from dollar stores such as Dollar Tree, and somebody on AudioKarma very fittingly described them as 'clothes pegs on steroids'.
With everything installed and held in place by the clamps, I ran through the tone sequence from 50Hz to 400Hz in intervals of 50Hz. If I remember this correctly, the Infinity RS-4b woofers showed the largest voice coil movement around 150Hz. I was wondering if it wouldn't be enough to test them at this one frequency, but since people more knowledgeable than I had recommended it, I ran through the whole sequence with all woofers for good measure. With three woofers very little adjustment was necessary, if any. With the fourth one I had to loosen the clamps a few time, and move the surround here and there until no more voice coil rubbing could be noticed. That accomplished, I disconnected the woofer from the centering setup, and set it aside over night to allow the glue to dry.
The next day I installed the woofers in the Infinity RS-4b, and let them rip! These Infinities have a very tight and fast but unobtrusive bass - never boomy. In fact, the way they handle low frequencies is so different from my other speakers that I initially wondered if something was wrong. However fellow AudioKarma members have assured me that what I am hearing is exactly what I should expect of these Infinities. With their incredibly clear mids and highs they have really grown on me, and have become my main speaker pair. I even went so far as complementing them with a Yamaha R2000 vintage receiver with 150wpc, which seems to be the kind of power these speakers enjoy and deserve. I still can't believe I got these wonderful speakers for the price I paid - and a bit of work invested into re-foaming them - a job that was more fun than work!
All four woofers are perfectly centered. The last one is still hooked up to the centering setup.
The surrounds had been attached to the speaker cone the previous day. Now I tilted the outside of the surrounds a little upward, and applied a thin ring of glue between them and the top of the cardboard ring on the outside of the speaker casing. Then I applied a similar thin ring of glue to the underside of the rubber mounting gasket that I had previously removed from the woofers. I then installed the rubber mounting gasket and held the surrounds in place by plastic clamps. These clamps are available as sets of four for $1 from dollar stores such as Dollar Tree, and somebody on AudioKarma very fittingly described them as 'clothes pegs on steroids'.
With everything installed and held in place by the clamps, I ran through the tone sequence from 50Hz to 400Hz in intervals of 50Hz. If I remember this correctly, the Infinity RS-4b woofers showed the largest voice coil movement around 150Hz. I was wondering if it wouldn't be enough to test them at this one frequency, but since people more knowledgeable than I had recommended it, I ran through the whole sequence with all woofers for good measure. With three woofers very little adjustment was necessary, if any. With the fourth one I had to loosen the clamps a few time, and move the surround here and there until no more voice coil rubbing could be noticed. That accomplished, I disconnected the woofer from the centering setup, and set it aside over night to allow the glue to dry.
The next day I installed the woofers in the Infinity RS-4b, and let them rip! These Infinities have a very tight and fast but unobtrusive bass - never boomy. In fact, the way they handle low frequencies is so different from my other speakers that I initially wondered if something was wrong. However fellow AudioKarma members have assured me that what I am hearing is exactly what I should expect of these Infinities. With their incredibly clear mids and highs they have really grown on me, and have become my main speaker pair. I even went so far as complementing them with a Yamaha R2000 vintage receiver with 150wpc, which seems to be the kind of power these speakers enjoy and deserve. I still can't believe I got these wonderful speakers for the price I paid - and a bit of work invested into re-foaming them - a job that was more fun than work!
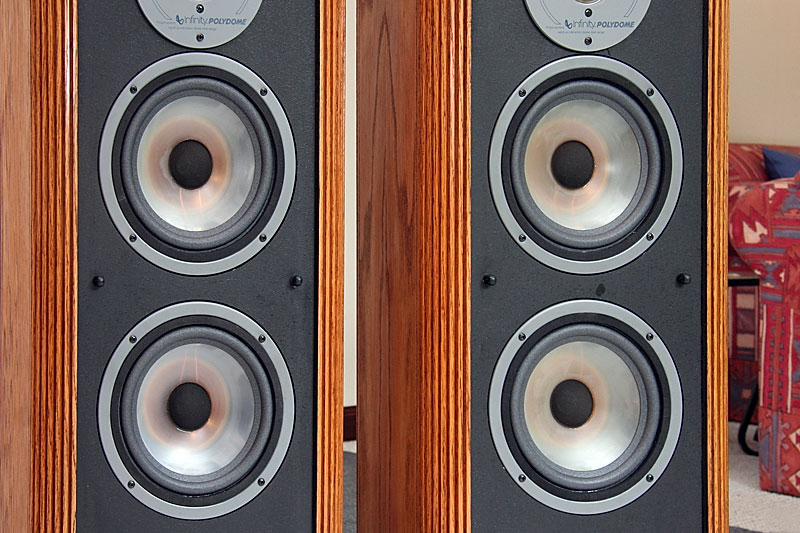 All four woofers re-foamed and installed in the beautiful Infinity RS-4b speaker cabinets.
 My main system as of June 2008. Receiver: Yamaha R2000, TT: Mitsubishi LT-20, CDP: Onkyo DX-702 mod op amp, Tape: Nakamichi 480, Speakers: Infinity RS-4b and Infinity Outrigger (outside on the deck). The cute little Realistic equalizer is connected, but usually by-passed and serves cosmetic purposes only - as well as to prevent my kids from placing their games on the system!
 Yamaha R2000 vintage receiver. With 150wpc the perfect complement for these Infinity RS-4b.
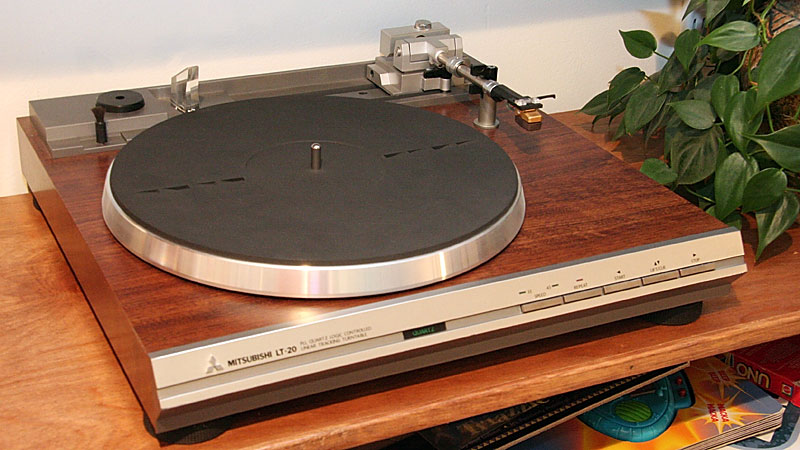
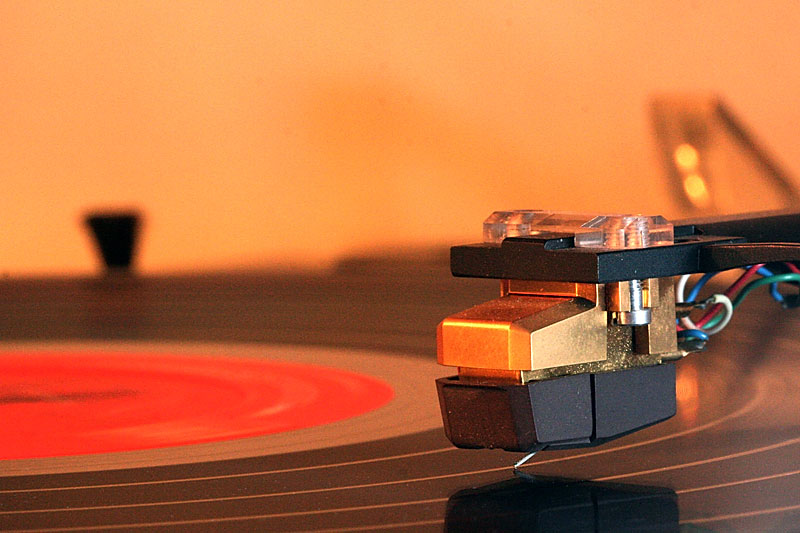
 And for good measure, three pictures of my turn table - a direct drive, linear tracking Mitsubishi LT-20 with Audio Technica Signet cartridge.
Addendum 12 June 2008:
I received the following comment from fellow AudioKarma member SA-708 member, that I thought worth sharing with you:
And for good measure, three pictures of my turn table - a direct drive, linear tracking Mitsubishi LT-20 with Audio Technica Signet cartridge.
Addendum 12 June 2008:
I received the following comment from fellow AudioKarma member SA-708 member, that I thought worth sharing with you:
"The only 'tool' I used that you didn't mention was a D cell battery hooked to a short run of speaker wire. Since I was working on Cerwin-Vega woofers with paper cones and with the surrounds glued directly to the metal frame, I could use the battery rig connected in one direction to pull the cone all the way in while I cleaned the woofer basket, then reversed the wires to push the cones out clear of the basket when I cleaned them up (I used isopropyl alcohol). The DC signal was also useful in keeping the voice coil centered while gluing on the surround, although I did test them with a signal before the glue set."I had seen the use of a battery mentioned elsewhere, but this comment by SA-708 is the best explanation of how it works that I've seen so far.
Leave a Reply
You must be logged in to post a comment.
