The Stand
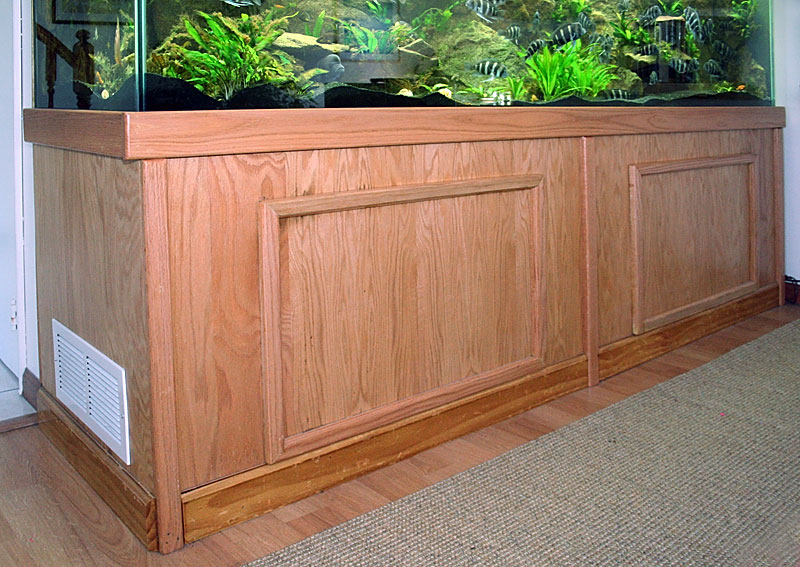 The Glasscages oak stand for a 240G long tank.
Buying the stand and canopy from Glasscages obviously increased the cost of that order considerably, but even the cost of good, furniture-grade plywood to build a stand and canopy of this size would be significant. I figured I would be busy enough staining the stand and canopy as well as installing lighting and designing the whole filtration system, and so decided to spring the money for the stand and canopy. At the time of me buying the tank, Glasscages was offering 24" and 30" stands on their site. I believe since they are custom made, they can make the stand any height you desire, but they talked me into the 30" stand. I am very glad that they did, because the viewing height is just right for people sitting on the sofas in my living room, and I really need the height inside the stand in order to accommodate the sumps, and other accessories. In fact, when I still had my FBFs I was actually wishing for another couple of inches, but luckily that problem has resolved itself.
Interestingly, the stability of the stand relies almost exclusively on the stability of the ¾" plywood itself. There is only a single 2x6 brace across the middle of the stand that's supported by 2x4s - that's it! Even in the corners, there are only 2x1s, which are probably meant more to provide a larger surface to glue the plywood together, than to bear any weight. I am sure if a do-it-yourselfer posted the design of this stand on any of the corresponding internet forums, people would be incredulous that anybody could propose such a flimsy thing, and/or suggest a million re-enforcements. Fact is, I had the tank now for more than two years on that stand, with no ill affects whatsoever, despite an initial flood where the whole bottom of the stand got soaked with water. I think this goes to show you that most of our home-made stands are ridiculously over engineered, but what the heck - better to slab in a few more 2x4s, which cost peanuts, than to end up with 240G of water sloshing around your house.
The Glasscages oak stand for a 240G long tank.
Buying the stand and canopy from Glasscages obviously increased the cost of that order considerably, but even the cost of good, furniture-grade plywood to build a stand and canopy of this size would be significant. I figured I would be busy enough staining the stand and canopy as well as installing lighting and designing the whole filtration system, and so decided to spring the money for the stand and canopy. At the time of me buying the tank, Glasscages was offering 24" and 30" stands on their site. I believe since they are custom made, they can make the stand any height you desire, but they talked me into the 30" stand. I am very glad that they did, because the viewing height is just right for people sitting on the sofas in my living room, and I really need the height inside the stand in order to accommodate the sumps, and other accessories. In fact, when I still had my FBFs I was actually wishing for another couple of inches, but luckily that problem has resolved itself.
Interestingly, the stability of the stand relies almost exclusively on the stability of the ¾" plywood itself. There is only a single 2x6 brace across the middle of the stand that's supported by 2x4s - that's it! Even in the corners, there are only 2x1s, which are probably meant more to provide a larger surface to glue the plywood together, than to bear any weight. I am sure if a do-it-yourselfer posted the design of this stand on any of the corresponding internet forums, people would be incredulous that anybody could propose such a flimsy thing, and/or suggest a million re-enforcements. Fact is, I had the tank now for more than two years on that stand, with no ill affects whatsoever, despite an initial flood where the whole bottom of the stand got soaked with water. I think this goes to show you that most of our home-made stands are ridiculously over engineered, but what the heck - better to slab in a few more 2x4s, which cost peanuts, than to end up with 240G of water sloshing around your house.
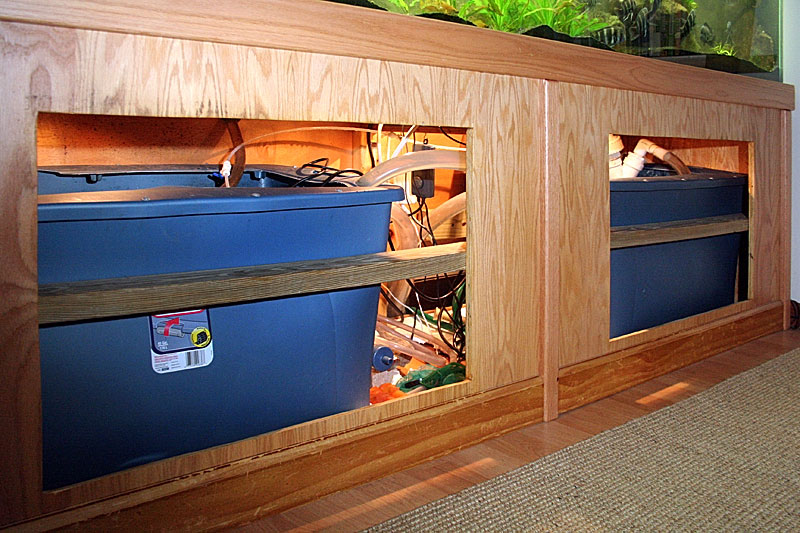 View of the stand with the 'lift off doors' removed.
The Glasscages Stand comes unstained, which obviously creates a bit of work for you, but allows you to match the color to your furniture. I did not stain the stand at all, but simply varnished it using clear semi-gloss Helmsman Spar Urethane made by Minwax. The stuff should be available at any Lowes or Home Depot, and is recommended for indoor and outdoor use, which I figured would give a good chance for sufficient moisture protection, while at the same time not releasing too many toxins into the atmosphere that might find their way into my tank water. At the time of writing this, and about two years after initially setting up the tank, I can say that I am happy with my choice.
To access the interior of the stand there are no hinged doors, but two 'hatches' that are taken out completely. Glasscages calls them 'lift off doors'. This is great for major maintenance, when you can work in the stand without having a door in your way. However, removing and re-inserting the hatches is somewhat less convenient than opening a door. Mine jam a little bit, which I could easily fix by a some sanding here and there, but I have two kids of 7 and 8 which are always up to no good, and as it is, they'd have a very hard time opening the hatches, which is clearly a good thing.
There is only one quibble I had with the stand when setting it up, and this is that the holes in the stand for the drainpipes did not line up 100% with the holes in the tank for the corresponding bulkheads. Had I known this from the outset I could easily have fixed the problem by making the holes in the stand larger using a jigsaw. As it was, I discovered the problem only after the tank had been put in place and I had my real rock background installed, so that there was no easy way to get the tank off the stand again. As a result, I had to work with the jigsaw overhead in the stand to enlarge the holes, all the while taking care that the jigsaw would not touch and chip the tank. Frankly this was a bit of a pest, and I was swearing profusely at the time, but it's now all water under the bridge, and Glasscages, I forgive you! In summary, The Glasscages stand does a fine job, and in my opinion it is well worth the money they are asking for it. I was a little concerned about moisture built-up and possibly resulting mold formation in the cabinet due to the two open sump containers in there. To preclude this from happening, I opened the cabinet up at the back on the right hand side, because that's where the ducted heating/air conditioning system in my house has a huge air intake. I removed the grid in front of the duct, which also allowed me to feed the pipes for the continuous automatic water change system (CAWC) through that space into the basement. In addition, I installed a metal grid on the very left hand side of the cabinet, thus allowing air going into the duct to circulate through the whole cabinet first. I do not know if it is due to this setup, but at any rate, the cabinet looks dry all year round, and there has never been a problem with mold formation.
The top of the cabinet is covered with sheets of 3/4" Styrofoam (not the thinner 1/2" Styrofoam that Glasscages provided) to prevent any pressure points from forming that could lead to cracking of the tank. Last but not least, for my convenience when performing maintenance work, I installed a cabinet lighting system, which consists of four little halogen lights available from any hardware store, such as Lowes or Home Depot. The lights are simply screwed to the bottom of top cover of the stand, and can be switched on by a standard light switch on the side of the stand between the two doors. These lights are cheap, easy to install, and increase safety when working in the stand considerably. If I did not have them I would have to use a portable lamp whenever I wanted to inspect the inside of the sump containers, and risk dropping it into the sump, potentially electrocuting my fish and/or myself.
Photos showing the inside of the stand are at the bottom of the page of the introduction to the filtration section.
View of the stand with the 'lift off doors' removed.
The Glasscages Stand comes unstained, which obviously creates a bit of work for you, but allows you to match the color to your furniture. I did not stain the stand at all, but simply varnished it using clear semi-gloss Helmsman Spar Urethane made by Minwax. The stuff should be available at any Lowes or Home Depot, and is recommended for indoor and outdoor use, which I figured would give a good chance for sufficient moisture protection, while at the same time not releasing too many toxins into the atmosphere that might find their way into my tank water. At the time of writing this, and about two years after initially setting up the tank, I can say that I am happy with my choice.
To access the interior of the stand there are no hinged doors, but two 'hatches' that are taken out completely. Glasscages calls them 'lift off doors'. This is great for major maintenance, when you can work in the stand without having a door in your way. However, removing and re-inserting the hatches is somewhat less convenient than opening a door. Mine jam a little bit, which I could easily fix by a some sanding here and there, but I have two kids of 7 and 8 which are always up to no good, and as it is, they'd have a very hard time opening the hatches, which is clearly a good thing.
There is only one quibble I had with the stand when setting it up, and this is that the holes in the stand for the drainpipes did not line up 100% with the holes in the tank for the corresponding bulkheads. Had I known this from the outset I could easily have fixed the problem by making the holes in the stand larger using a jigsaw. As it was, I discovered the problem only after the tank had been put in place and I had my real rock background installed, so that there was no easy way to get the tank off the stand again. As a result, I had to work with the jigsaw overhead in the stand to enlarge the holes, all the while taking care that the jigsaw would not touch and chip the tank. Frankly this was a bit of a pest, and I was swearing profusely at the time, but it's now all water under the bridge, and Glasscages, I forgive you! In summary, The Glasscages stand does a fine job, and in my opinion it is well worth the money they are asking for it. I was a little concerned about moisture built-up and possibly resulting mold formation in the cabinet due to the two open sump containers in there. To preclude this from happening, I opened the cabinet up at the back on the right hand side, because that's where the ducted heating/air conditioning system in my house has a huge air intake. I removed the grid in front of the duct, which also allowed me to feed the pipes for the continuous automatic water change system (CAWC) through that space into the basement. In addition, I installed a metal grid on the very left hand side of the cabinet, thus allowing air going into the duct to circulate through the whole cabinet first. I do not know if it is due to this setup, but at any rate, the cabinet looks dry all year round, and there has never been a problem with mold formation.
The top of the cabinet is covered with sheets of 3/4" Styrofoam (not the thinner 1/2" Styrofoam that Glasscages provided) to prevent any pressure points from forming that could lead to cracking of the tank. Last but not least, for my convenience when performing maintenance work, I installed a cabinet lighting system, which consists of four little halogen lights available from any hardware store, such as Lowes or Home Depot. The lights are simply screwed to the bottom of top cover of the stand, and can be switched on by a standard light switch on the side of the stand between the two doors. These lights are cheap, easy to install, and increase safety when working in the stand considerably. If I did not have them I would have to use a portable lamp whenever I wanted to inspect the inside of the sump containers, and risk dropping it into the sump, potentially electrocuting my fish and/or myself.
Photos showing the inside of the stand are at the bottom of the page of the introduction to the filtration section.
Leave a Reply
You must be logged in to post a comment.
