The Sump Containers
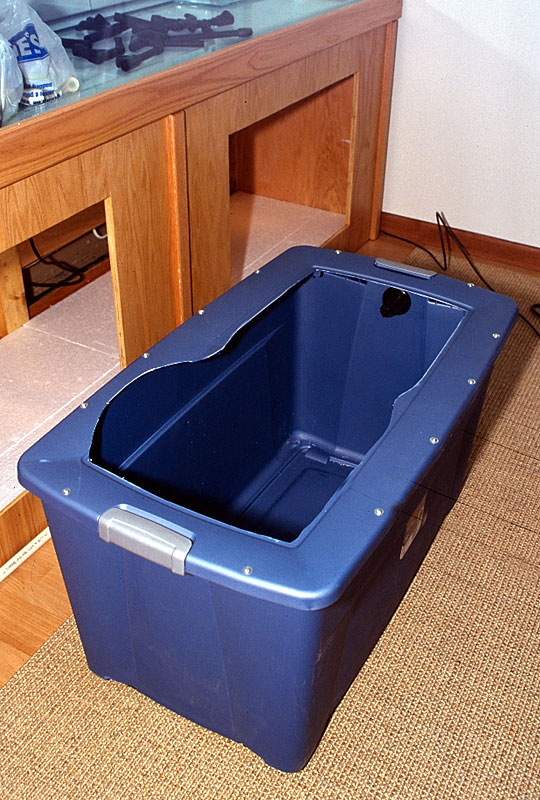 My sump containers are 45G Sterilite totes that I bought at Walmart for not much money. Sterilite is a competitor of Rubbermaid with pretty much the same products at similar prices. I chose the Sterilite containers over Rubbermade only because these just happened to fit my cabinet better than anything else I could find.
The main problems people seem to be having with using these kinds of cheap plastic containers as sumps are bulging and cracking around the feet. These containers are not designed to be filled with water. Yet I believe they can be used safely if some precautions are taken. To prevent bulging, I did not remove the lid from the containers, but cut the inner part of the lid out using a box cutter knife. I used screws to secure the remaining frame on the container to give it some extra support around the upper perimeter. In addition, the long sides of my containers - both front and back - are supported by 8x4s in my tank stand. These measures combined eliminate the bulging issue almost completely.
My sump containers are 45G Sterilite totes that I bought at Walmart for not much money. Sterilite is a competitor of Rubbermaid with pretty much the same products at similar prices. I chose the Sterilite containers over Rubbermade only because these just happened to fit my cabinet better than anything else I could find.
The main problems people seem to be having with using these kinds of cheap plastic containers as sumps are bulging and cracking around the feet. These containers are not designed to be filled with water. Yet I believe they can be used safely if some precautions are taken. To prevent bulging, I did not remove the lid from the containers, but cut the inner part of the lid out using a box cutter knife. I used screws to secure the remaining frame on the container to give it some extra support around the upper perimeter. In addition, the long sides of my containers - both front and back - are supported by 8x4s in my tank stand. These measures combined eliminate the bulging issue almost completely.
 Unsupported plastic tote bulging due to being filled with water. In the background is a FBF doing a test run.
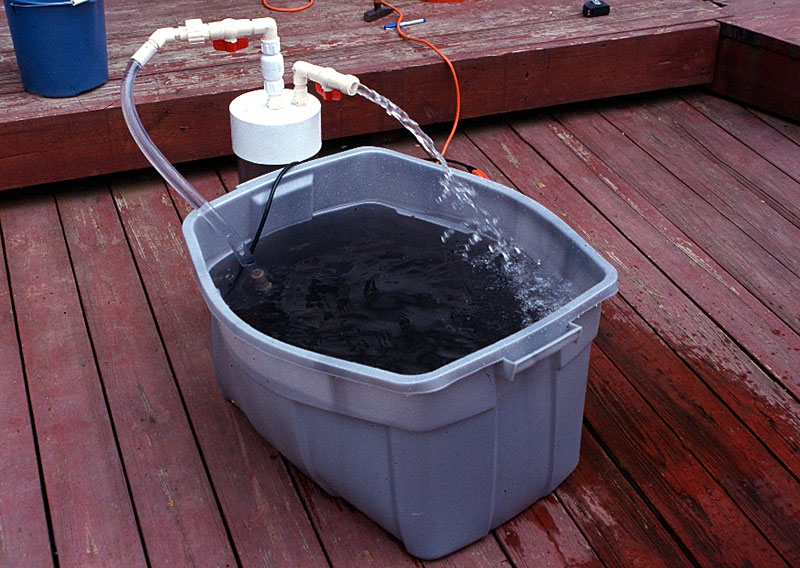
Cracking seems to occur mostly around the little molded feet that are part of these totes. When filled with water, the weight of the water will push the container down, and if the foot sits of top of a hard surface, it will be pushed up into the tank, which can lead to cracking of the plastic. I have placed my sump containers on ¾" Styrofoam sheets, which ensure that the tank doesn't sit on the feet only, but its entire bottom surface is evenly supported. Two years after setting these containers up as sumps, and having the continuously filled with water almost to the brim, they show no appreciable signs of strain or wear.
Since it is technically impossible to ensure that the overflow box on each side picks up the exact amount of water that its corresponding pump transports into the tank, the two sumps have to be connected in order to allow their water levels to balance out. In line with my policy to use as few bulkheads as possible to reduce the chance of leaks, I am using a siphon hose as sump connector. This is a 1" clear PVC hose that is filled with water and has each end submerged in one of the tanks. As soon as the water level in one sump is about to rise over the other, the siphon will start and this hose levels the sumps out. In practice, water seems to be continuously running in one direction or another, with the amount and direction changing by minute differences in debris collecting around the overflows which leads to more water draining through sometimes this, sometimes the other overflow box. I have found two medication bottles, which I can use as stoppers on each end of the connector hose. In this way I close the hose off during maintenance. Any air bubbles in the hose can be removed by flushing it with a garden hose, that I have permanently installed in the sump cabinet, and that can be connected to a tap in the basement, not only for this purpose, but also to refill the sumps following major maintenance.
Unsupported plastic tote bulging due to being filled with water. In the background is a FBF doing a test run.
Cracking seems to occur mostly around the little molded feet that are part of these totes. When filled with water, the weight of the water will push the container down, and if the foot sits of top of a hard surface, it will be pushed up into the tank, which can lead to cracking of the plastic. I have placed my sump containers on ¾" Styrofoam sheets, which ensure that the tank doesn't sit on the feet only, but its entire bottom surface is evenly supported. Two years after setting these containers up as sumps, and having the continuously filled with water almost to the brim, they show no appreciable signs of strain or wear.
Since it is technically impossible to ensure that the overflow box on each side picks up the exact amount of water that its corresponding pump transports into the tank, the two sumps have to be connected in order to allow their water levels to balance out. In line with my policy to use as few bulkheads as possible to reduce the chance of leaks, I am using a siphon hose as sump connector. This is a 1" clear PVC hose that is filled with water and has each end submerged in one of the tanks. As soon as the water level in one sump is about to rise over the other, the siphon will start and this hose levels the sumps out. In practice, water seems to be continuously running in one direction or another, with the amount and direction changing by minute differences in debris collecting around the overflows which leads to more water draining through sometimes this, sometimes the other overflow box. I have found two medication bottles, which I can use as stoppers on each end of the connector hose. In this way I close the hose off during maintenance. Any air bubbles in the hose can be removed by flushing it with a garden hose, that I have permanently installed in the sump cabinet, and that can be connected to a tap in the basement, not only for this purpose, but also to refill the sumps following major maintenance.
 Sump container installed in the cabinet. The horizontal 2x4" piece of lumber running across the opening supports the sump container to prevent bulging and is removable to allow the sump to be taken out for major maintenance procedures.
One Response to “The Sump Containers”
Leave a Reply
You must be logged in to post a comment.

August 24th, 2008 at 1:31 pm
Thanks for having such a great site on setting up a 240.
These Sterilite totes, what are their dimentions? Are the similar to the totes listed at:
http://sterilite.com/Category.html?Section=Storage&ProductCategory=150#
Thanks!