The FBFs
This part of the filtration system is no longer is no longer in use, but the page provides valuable information about the pros and cons of using fluidized bed filters (FBFs) for aquarium filtration.
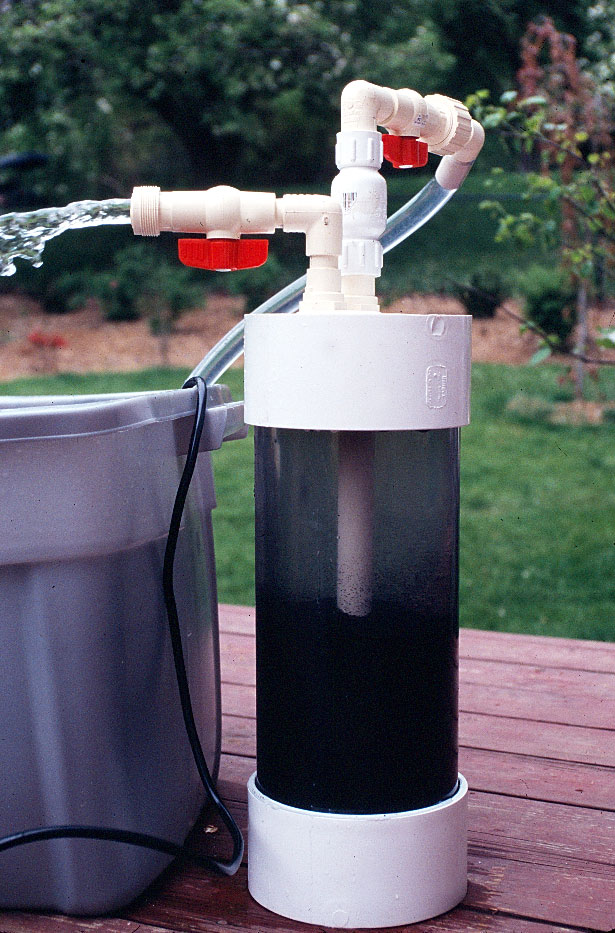 A fluidized bed filter is basically a canister filter without media, but with a bit of sand at the bottom, into which the pump pushes water to swirl it around. This puts the sand in the 'fluidized state', and means that the entire surface area of each single grain of sand becomes available for colonization by bacteria. Even just a little sand has a huge surface area, and the biofiltration capacity of FBFs is huge. This is a great article explaining the basics of FBFs and giving you instructions how to build one by Brad Newton (a.k.a. Featherfinfan on Cichlid-forum).
My reason for building my own FBF was that commercial models are limited by low flow rates, which forces the user to lead only part of the water circulating through his system though the FBF. My filters were built to withstand the full flow rate of a Danner MagDrive 18 pump, allowing me to integrate the FBF into the heart of the filtration system, and pushing all the circulating water through it. I wanted to be able to see inside the filter to be able to monitor whether or not the sand was in the fluidized state. Yet I was not too comfortable working with acrylic as described in Brad's article. For these reasons I made the filter from 6" clear PVC pipe (clear pipe, 6", SAVKO part# 15060), which is available from SAVKO Plastic Pipe & Fittings Inc.. I closed the pipe on both ends with schedule 40 PVC end caps, which you can get at most hardware stores like Lowes or Home Depot. Into one of the end caps I put two bulkheads made from 3/4" CPVC as described in this article by Marc Elieson on Cichlid-forum. In addition you need a check valve at the entry to the FBF. Whatever pump you are using, it will not be capable of freeing the pipe that pushes water into the sand and get the FBF started. You need to do this using a garden hose and full pressure from your water mains. When you disconnect the hose, the check valve will prevent the sand from pushing back, and then your pump should easily be able to re-start the filter. The check valve will also prevent any sand from the filter pushing back into your pump, and it will prevent water from siphoning out of your tank in case of a pump failure or power outage.
While FBFs excel at biofiltration, they suck at mechanical filtration, and easily block up when debris accumulates in them, clumping the sand together. In my case this was not a problem, since the FBFs were situated in the return pipe from the pump to the UGJ system and tank; that is water entering the FBFs had just run through my 25μ micron filter bags and should be free of any larger particles.
The FBFs ran well as long as I had them, yet there was little space in the cabinet under my tank, and even though the FBFs required maintenance rarely, it became too much of a chore. I had to drain at least one of the sump containers completely and remove it from the stand in order to get to the FBFs. I also found that the FBFs severely limited the flow trough my pumps, meaning with FBFs I needed to run a much larger pump to a achieve the same flow I could get from a smaller pump without FBFs. Of course running a bigger pump adds to your energy bill on a daily basis. Last but not least, I had hugely underestimated the capacity of the micron filter bags to provide not only mechanical but also biological filtration. In short, the FBFs did more harm than good, and I took them out of the system.
Below you can see a schematic diagram of the plumbing of my 240G tank with the FBFs still in place.
A fluidized bed filter is basically a canister filter without media, but with a bit of sand at the bottom, into which the pump pushes water to swirl it around. This puts the sand in the 'fluidized state', and means that the entire surface area of each single grain of sand becomes available for colonization by bacteria. Even just a little sand has a huge surface area, and the biofiltration capacity of FBFs is huge. This is a great article explaining the basics of FBFs and giving you instructions how to build one by Brad Newton (a.k.a. Featherfinfan on Cichlid-forum).
My reason for building my own FBF was that commercial models are limited by low flow rates, which forces the user to lead only part of the water circulating through his system though the FBF. My filters were built to withstand the full flow rate of a Danner MagDrive 18 pump, allowing me to integrate the FBF into the heart of the filtration system, and pushing all the circulating water through it. I wanted to be able to see inside the filter to be able to monitor whether or not the sand was in the fluidized state. Yet I was not too comfortable working with acrylic as described in Brad's article. For these reasons I made the filter from 6" clear PVC pipe (clear pipe, 6", SAVKO part# 15060), which is available from SAVKO Plastic Pipe & Fittings Inc.. I closed the pipe on both ends with schedule 40 PVC end caps, which you can get at most hardware stores like Lowes or Home Depot. Into one of the end caps I put two bulkheads made from 3/4" CPVC as described in this article by Marc Elieson on Cichlid-forum. In addition you need a check valve at the entry to the FBF. Whatever pump you are using, it will not be capable of freeing the pipe that pushes water into the sand and get the FBF started. You need to do this using a garden hose and full pressure from your water mains. When you disconnect the hose, the check valve will prevent the sand from pushing back, and then your pump should easily be able to re-start the filter. The check valve will also prevent any sand from the filter pushing back into your pump, and it will prevent water from siphoning out of your tank in case of a pump failure or power outage.
While FBFs excel at biofiltration, they suck at mechanical filtration, and easily block up when debris accumulates in them, clumping the sand together. In my case this was not a problem, since the FBFs were situated in the return pipe from the pump to the UGJ system and tank; that is water entering the FBFs had just run through my 25μ micron filter bags and should be free of any larger particles.
The FBFs ran well as long as I had them, yet there was little space in the cabinet under my tank, and even though the FBFs required maintenance rarely, it became too much of a chore. I had to drain at least one of the sump containers completely and remove it from the stand in order to get to the FBFs. I also found that the FBFs severely limited the flow trough my pumps, meaning with FBFs I needed to run a much larger pump to a achieve the same flow I could get from a smaller pump without FBFs. Of course running a bigger pump adds to your energy bill on a daily basis. Last but not least, I had hugely underestimated the capacity of the micron filter bags to provide not only mechanical but also biological filtration. In short, the FBFs did more harm than good, and I took them out of the system.
Below you can see a schematic diagram of the plumbing of my 240G tank with the FBFs still in place.
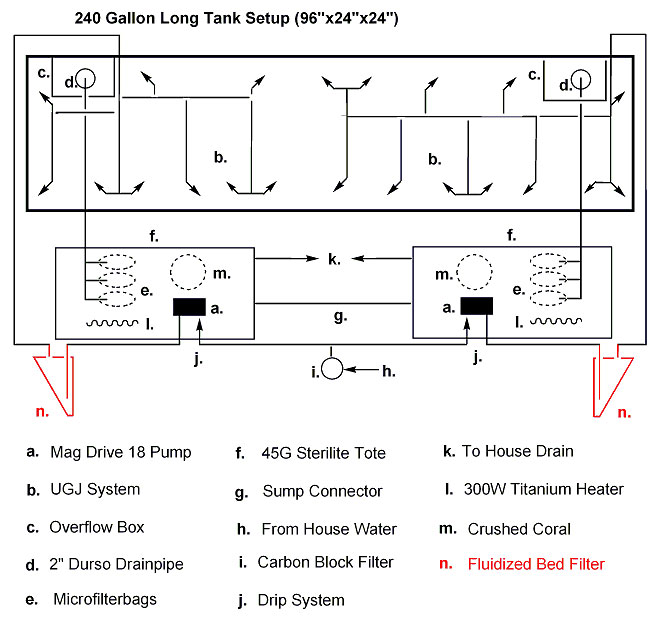 Schematic diagram of the plumbing of my 240G tank with the FBFs still in place. If you have trouble reading the text, please click on the diagram and a larger version will open in a new window.
A fluidized bed filter is basically a canister filter without media, but with a bit of sand at the bottom, into which the pump pushes water to swirl it around. This puts the sand in the 'fluidized state', and means that the entire surface area of each single grain of sand becomes available for colonization by bacteria. Even just a little sand has a huge surface area, and the biofiltration capacity of FBFs is huge. This is a great article explaining the basics of FBFs and giving you instructions how to build one by Brad Newton (a.k.a. Featherfinfan on Cichlid-forum).
My reason for building my own FBF was that commercial models are limited by low flow rates, which forces the user to lead only part of the water circulating through his system though the FBF. My filters were built to withstand the full flow rate of a Danner MagDrive 18 pump, allowing me to integrate the FBF into the heart of the filtration system, and pushing all the circulating water through it. I wanted to be able to see inside the filter to be able to monitor whether or not the sand was in the fluidized state. Yet I was not too comfortable working with acrylic as described in Brad's article. For these reasons I made the filter from 6" clear PVC pipe (clear pipe, 6", SAVKO part# 15060), which is available from SAVKO Plastic Pipe & Fittings Inc.. I closed the pipe on both ends with schedule 40 PVC end caps, which you can get at most hardware stores like Lowes or Home Depot. Into one of the end caps I put two bulkheads made from 3/4" CPVC as described in this article by Marc Elieson on Cichlid-forum. In addition you need a check valve at the entry to the FBF. Whatever pump you are using, it will not be capable of freeing the pipe that pushes water into the sand and get the FBF started. You need to do this using a garden hose and full pressure from your water mains. When you disconnect the hose, the check valve will prevent the sand from pushing back, and then your pump should easily be able to re-start the filter. The check valve will also prevent any sand from the filter pushing back into your pump, and it will prevent water from siphoning out of your tank in case of a pump failure or power outage.
While FBFs excel at biofiltration, they suck at mechanical filtration, and easily block up when debris accumulates in them, clumping the sand together. In my case this was not a problem, since the FBFs were situated in the return pipe from the pump to the UGJ system and tank; that is water entering the FBFs had just run through my 25μ micron filter bags and should be free of any larger particles.
The FBFs ran well as long as I had them, yet there was little space in the cabinet under my tank, and even though the FBFs required maintenance rarely, it became too much of a chore. I had to drain at least one of the sump containers completely and remove it from the stand in order to get to the FBFs. I also found that the FBFs severely limited the flow trough my pumps, meaning with FBFs I needed to run a much larger pump to a achieve the same flow I could get from a smaller pump without FBFs. Of course running a bigger pump adds to your energy bill on a daily basis. Last but not least, I had hugely underestimated the capacity of the micron filter bags to provide not only mechanical but also biological filtration. In short, the FBFs did more harm than good, and I took them out of the system.
Below you can see a schematic diagram of the plumbing of my 240G tank with the FBFs still in place.
Schematic diagram of the plumbing of my 240G tank with the FBFs still in place. If you have trouble reading the text, please click on the diagram and a larger version will open in a new window.
Leave a Reply
You must be logged in to post a comment.
