Continuous Automatic Water Change System (CAWC)
The way this automatic water change system works is basically identical to the one I built for my my 240G tank. I am explaining it in more details in the section about the 240G tank, but in a nutshell you need a cheap saddle valve (under $10), from the hardware store. These things are self drilling, allowing you to install them yourself on any water pipe with a simple screwdriver as the only required tool. From the saddle valve you run 1/4″ polyethylene tubing to your tank, through which you can drip water in the tank. I am aiming to add about 10% of total system volume per day, meaning I add about 13G to this tank per day. I can adjust the drip rate using the saddle valve, and check that I am about right by letting the drip go into a container for half an hour or an hour. I can then extrapolate how much will be added at the same drip rate in a day. The added water will make up for evaporation, but any excess will have to leave the tank via an overflow. Since this tank is not drilled, and uses a canister filter for filtration, I had to add a small overflow for the CAWC system. So far the basics, but how did I make it all work?
Getting water to the tank
 A saddle valve for the CAWC installed under a sink in a bathroom. The tubing disappears in a hole in the cabinet floor. I used a long drill at an angle to drill that hole so the tubing would come out at carpet level on the other side of the wall behind the sink.
With the 240G tank I was in the lucky position to have a water pipe in the ceiling right under the tank. This ceiling is in a laundry room in the basement, and the pipe is freely accessible, so installing the saddle valve was a breeze, and I could run the Polyethylene tubing through a heating duct (that was conveniently right in the perfect spot), to the sump under the tank. Almost too good to be true! The 125G tank is situated on the first floor, and not only is the ceiling underneath it fully finished, to the best of my knowledge there is no water pipe anywhere close. The best I could find was a bathroom on the opposite side of the house, separated from the corner were the tank sits by a stairwell and a hallway. The good news is that 1/4″ Polyethylene tubing is thin, and can be installed and hidden in a similar way you would electric wire. You just want to be a little more careful about sharp bends.
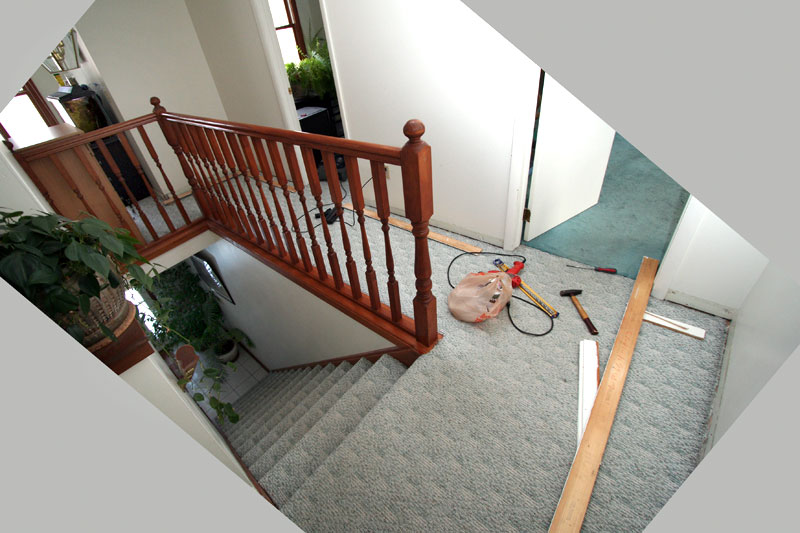
On the very left in the far background you can just make out a 29G tank. That’s where the new 125G tank will go. On the very right is a small section of wall. On the opposite side of that wall is a bathroom sink, which will be used as water supply for the CAWC. It was only possible to get both features in the same photo by using an extreme wide angle lens at 45 degree angle – hence distortion and the gray corners.
The picture above shows the hallway between the tank and the water supply. The 125G tank has not been set up yet, but you can see a little 29G tank in the background on the very left of the photo where the new tank will go. The bathroom from which the CAWC will draw water is behind the little section of wall you can see on the very right of the photo. I will drill through that wall to bring the Polyethylene tubing right through it. I have already removed all base boards from the walls between the spot where the tubing will come through the wall. It will protrude behind the baseboard, and then follow the wall at carpet level. Once the baseboard has been put back in place, the tubing will be invisible.
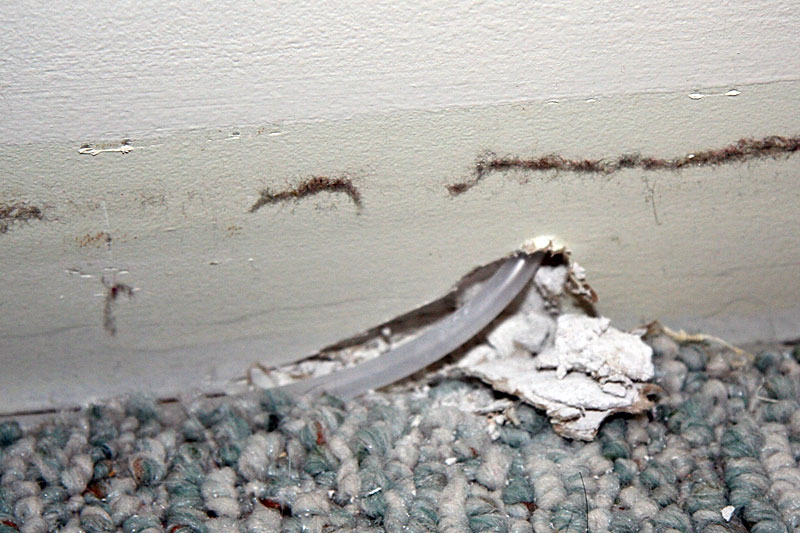
Here the 1/4″ Polyethylene tubing coming from the bathroom behind this wall, protrudes at carpet level. Once the baseboard has been put in place, it will be invisible.
As you can see in the photo, there are also two doors to cross, and this will be done under the carpet. In order to not have to remove the carpet, I am using a wire coat hanger like you get at the dry cleaners as a tool to pull the tubing under the carpet across the door opening. For this purpose, I am opening the coat hanger to give me a straight, sturdy piece of wire. It is comparatively easy to feed this wire under the carpet across the door opening. Then the tubing can be attached to one end of the wire using duct tape, scotch tape, or some such thing. If you pull the wire out on the other end with the tubing firmly attached, this will pull the tubing under the carpet across the door opening. You want to make sure not to have the tubing lie close to any sharp carpet staples, in order not to puncture it. Properly installed, amongst all the foam material under the carpet, and little wooden pieces used together with the carpet staples to hold the carpet in place, you will not be able to see where the tubing is under the carpet, nor will you be able to notice it when you walk over it.
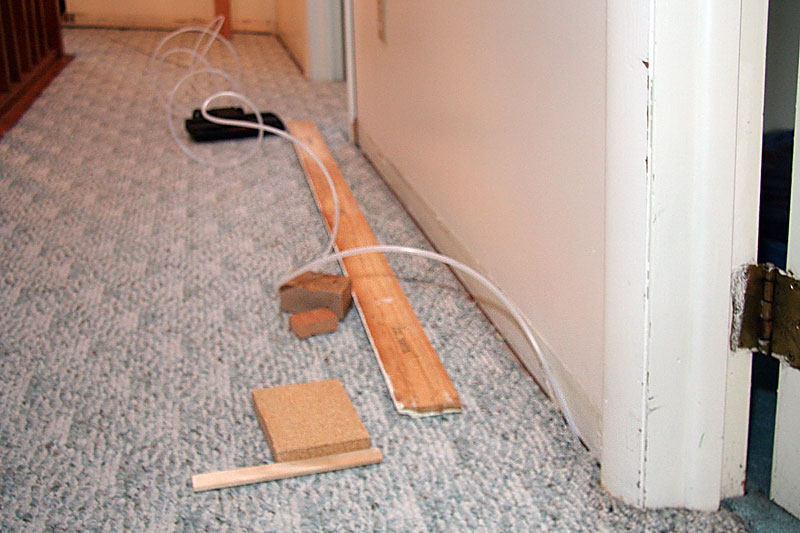
The tubing has been installed under the carpet to cross the first door, and is running towards the second door, and the future site of the 125G tank in the background.
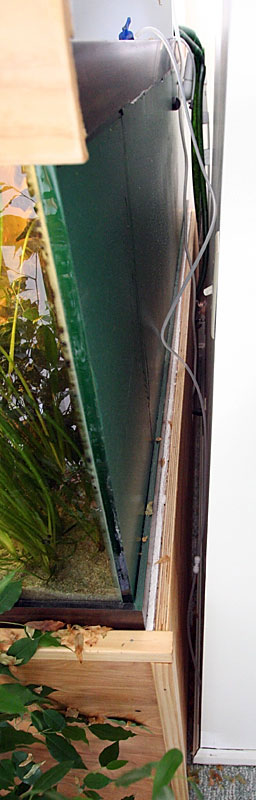 View behind the tank, where the CAWC tubing protrudes from behind the base board and runs up to water level. You can also see a little coupling in the tubing.
Behind the tank, the tubing is simply allowed to come out from behind the base board and runs up to water level, where I have installed a little tap. This tap could be used to control the drip rate instead of the saddle valve. However, this would mean having full water pressure on the tubing. While the tubing is rated to withstand this, it means an additional risk, and I have so far preferred to control the drip rate using the saddle valve in the bathroom, leaving the tap at the tank end of the tubing wide open at all times. The tap does fulfill some useful role, in that it makes it easier to secure the end of the tubing from slipping of the tank and dripping behind it than just a bare end of tubing.
The coupling is necessary whenever a commercially available length of tubing is not sufficient for your project. At Home Depot, where I was shopping, this was 25′. I needed only this one coupling, and I am glad that it is openly accessible, and not hidden eg. behind the base board. These couplings and the tubing I am using seem to be of excellent quality, and have not caused me any problems yet, but it gives me peace of mind to be able to check the coupling every once in a while!
For my 240G tank, I had included a carbon block filter in the CAWC system. Due to the low amount of chlorine added to the water by my municipality, this has turned out to be unnecessary. I have not once replaced the filter on the 240G CAWC since setting up the tank about 4 years ago from writing this. It should have been well worn and without function after about one year, meaning I have not had an effective filter on the tank for about 3 years now with no ill effects. With this in mind, I decided not to include a carbon block filter in the CAWC for this 125G tank.
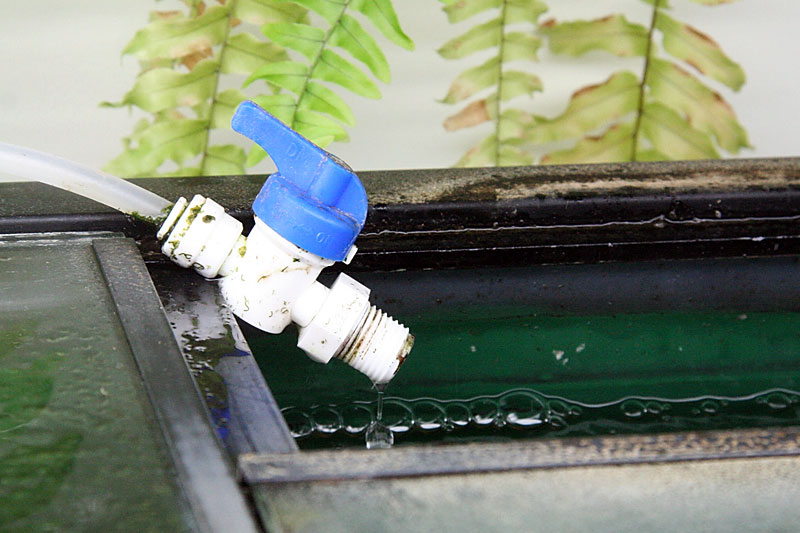
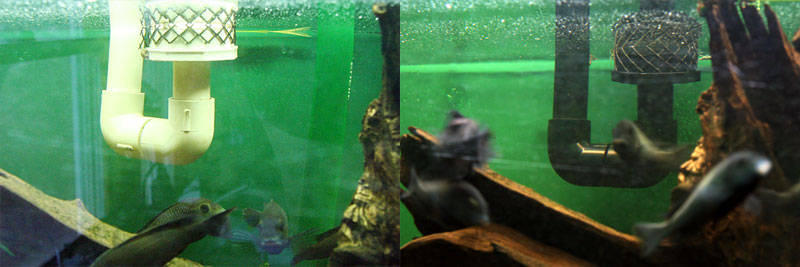
You can see the water from the CAWC system dripping into the tank. No more need for manual water changes! 🙂
Getting rid of excess water
Now you all know how I got the water for an automatic water change system to my tank, but where does the excess water go? Well, first of all it has to get out of the tank, so we need an overflow, and I certainly did not want to go to the hassle and expense of having my 125G drilled, especially since I already had the filtration issue sorted out with a canister filter. Siphon-fed overflow boxes that you can simply hang onto the side of a tank are of course commercially available, but as you probably figured out by now, I am cheap, and fellow aquarist Brian Shrimpton had made a very simple and elegant solution quite popular in my area in northeast Ohio. This is an overflow simply made from PVC pipe. I don’t know how well a version of this overflow from thicker pipe would work for a sump system, but made from 3/4″ pipe it is fantastic for an automatic water change system like mine!
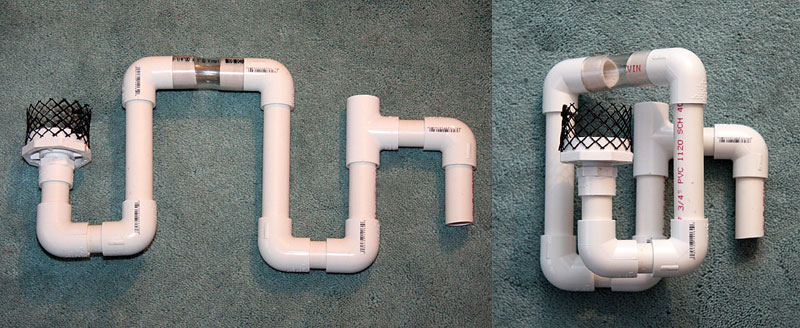
Siphon-fed overflow made from 3/4″ PVC pipe – stretched out on the left, and folded up for easier installation on the right.
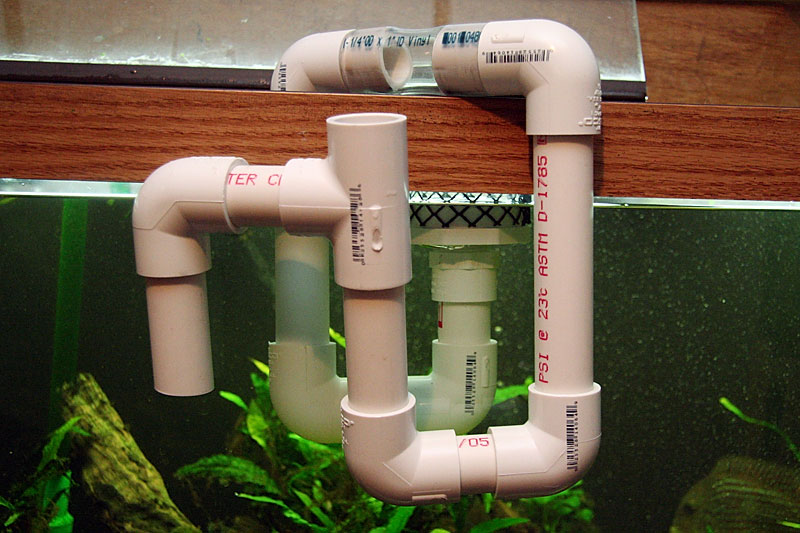
The overflow hanging on the front of my 75G Geophagus tank for demonstration only.
It would usually hang on the back of a tank exactly like shown in the picture above. All that’s needed to make it operational would be hooking the pipe to the very left up to a drain, and priming the overflow by fully submersing it, and turning it once upside down inside a tank or bucket to remove all air from the top part of the overflow. The little piece of transparent PVC tubing acts as a window, allowing you to check that there is no air in that part of the overflow, which indicates that the siphon is in tact.
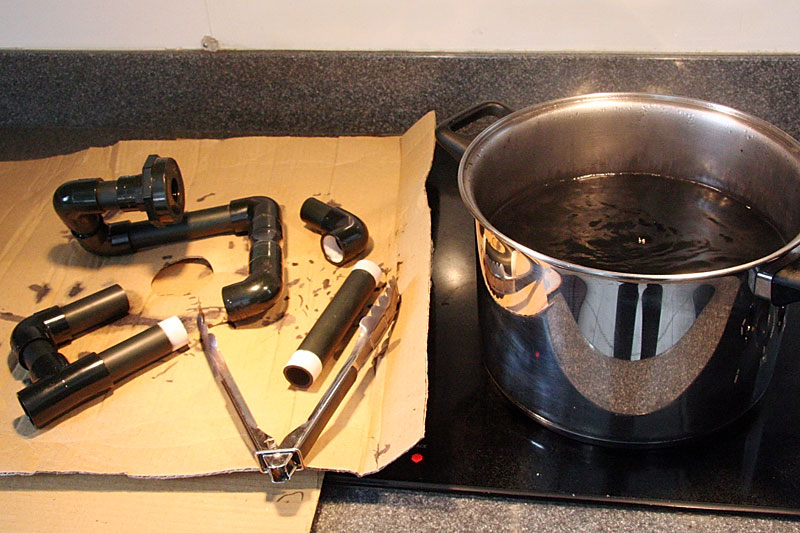
Dying the pipe using RIT clothing dye.
It’s hard to show this in photos, but white PVC pipe in a tank sticks out like the proverbial sore thumb, while black pipe tends to blends in remarkably well. If looks are at all important to you, you might want to dye at least the part of the overflow that is visible in the tank black. Details about how to dye PVC pipe using RIT clothing dye are on the page about the UGJ system of my 240G. Here I would just like to reiterate that you need to make sure you actually have PVC pipe, and not CPVC pipe, which is extremely reluctant to take up color. You also want to be careful not to boil the parts too much, if you need to reassemble them after the dyeing process. If PVC gets overheated it has a tendency to warp, and the pieces won’t fit together any more. Best to have some spare parts handy – or to dye the whole project while assembled, which of course is only possible for smaller items. An idea I had after dyeing these overflows – too late to use myself for this project, but not too late to pass on to you – is to put short pieces of pipe into elbows and other PVC fittings to prevent them from warping. The actually pipe seems to be less prone to this than the other fittings, so I think this would probably work quite well.
Original color white overflow (left), and overflow after dying with black RIT dye.
With the excess water removed from the tank via or handy overflow made from 3/4″ PVC pipes, the question arises where to go with it now. With my 240G tank the situation was a lot easier, since the tank was on the ground floor, just above a laundry room in the basement. Having 1″ PVC tubing run through a heating duct into the basement and connecting it to a drain was not a big issue. Unfortunately there is no drain anywhere near my 125G tank, which is on the first floor of the house, and running 1″ PVC tubing to the bathroom from where I got the water was not an option. For a drain you can not get away with 1/4″ tubing. I was willing to go down to 3/4″ but even that is impossible to hide behind a baseboard, and anything thinner would give me a headache for fear of blockage leading to a major water spill into the house. Luckily the tank sits along an outside wall, so one option seemed drilling a hole in the wall and letting the excess water run onto the garage roof outside. No sooner said than done, here is the hole in the wall.
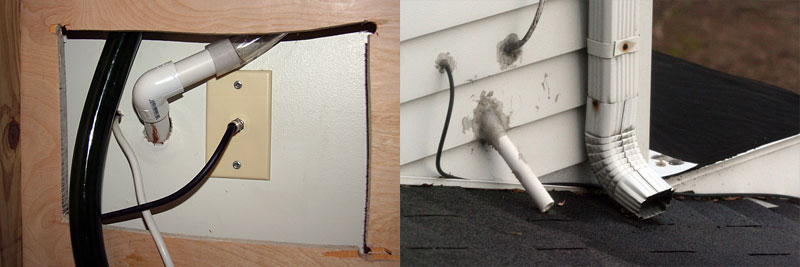
The CAWC of my 125G tank drains on to the roof of my garage.
In the left photo above, you can see the wall under my fish tank through a hole that I sawed into the back wall of the cabinet. The two electric cables have nothing to do with the fish tank. The black one is cable TV and my internet connection entering the house, and the white one is electricity going on the garage roof, where I need it to hook up X-mas lights around that time of the year. The big dark green pipe is the intake of my Eheim 2260. The 3/4″ PVC pipe with the 90 degree angle is what matters here, since it is the drain pipe from the overflow for the CAWC.
In the right photo above you can see the outside of that very same wall with the two electrical cables already mentioned and the spout from the gutter coming down from my main roof. Only the little 3/4″ PVC pipe is the outlet for the CAWC system of my 125G tank. When I installed the pipe, I figured nobody but me would ever look onto that garage roof, not thinking that I would put a photo of it on the net. Had I considered this, I might have done a neater job with the silicone I smeared around the pipe to prevent rain water from entering the wall. 🙂
One major concern I had when setting up this system was that I pretty much assume this pipe would be closed by ice in winter. I set up the system in summer, and was planning to observe the situation when it became colder, and sort this issue out when it became necessary. Possible solutions I had in mind where setting up a standard air pump over the tank, and forcing warm air from that area through the pipe to prevent ice from forming. One concern with that was that the air over the tank of course has a very high humidity, which could actually aggrevate the situation. Another idea was to use heating wire in the pipe like people use in terrariums. To make a long story short, despite a very cold winter 2008/2009, where the river here in Kent froze over more than I had seem in the previous seven years of living here, so far I have had no trouble with the pipe. I happened to be away for one month over Christmas, and turned the CAWC off during that time, in order not to run into trouble with ice formation and flooding the house. Afterwards I turned it on again, and so far so good, despite some nights with temperatures as low as -20 ºC (about -4 ºF). I believe what is helping me here is that the corner of the roof onto which the CAWC drains is a comparatively sheltered, east-facing spot that gets plenty of morning sun. In addition, the cabinet under the tank is basically heated by the tank on top and a big filter in it. This seems to keep the pipe warm enough so that no ice forms inside it.
One Response to “Continuous Automatic Water Change System (CAWC)”
Leave a Reply
You must be logged in to post a comment.

September 26th, 2014 at 11:44 am
[…] I'm no expert, but I have run a sump on my 155g for a few years. It looks fine, other than the pre-filter on the overflow intake (I think that's what you have shown in your drawing). Of course you wouldn't want a pre-filter that would catch sediment and potentially plug, only a plastic type one similar to those on canister filter intakes. And of course you should add an auto change water system while you're at it . This guy does a really nice job explaining how to do it. fmueller.com » Continuous Automatic Water Change System (CAWC) […]